The stack, bottom to top
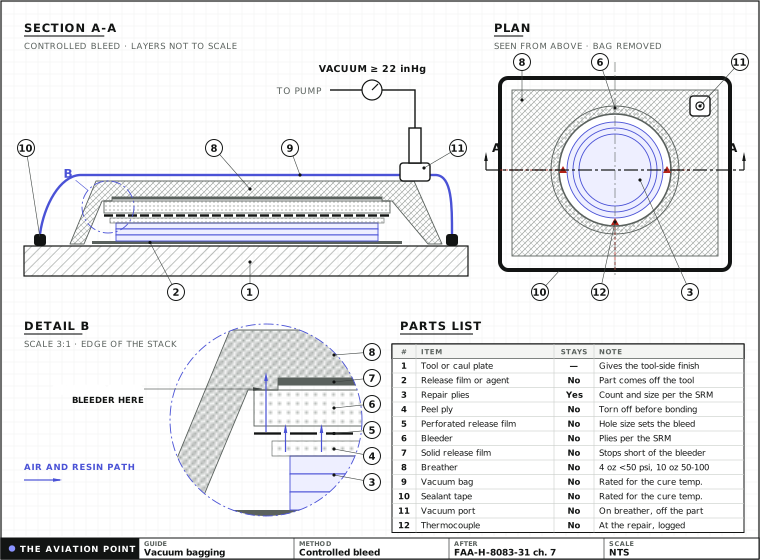
Each layer: job, material, when it changes
| # | Layer | What it does | Usual material | Changes when |
|---|---|---|---|---|
| 1 | Tool or caul plate | Holds the shape and gives the tool-side finish. A thin caul on top evens the pressure under a heat blanket. | Aluminium caul, mould, tooling board | Curing on the aircraft: the structure itself is the tool |
| 2 | Release agent or solid release film | The cured part comes off the tool. | Mould release; FEP or similar solid film | Never left out on a tool |
| 3 | Repair plies | The structure. The only layer that stays. | Prepreg or wet layup fabric | Set by the SRM ply table |
| 4 | Peel ply | Cures with the part and is torn off just before the next bond or paint, leaving a clean, textured surface. | Heat-set polyester (preferred), nylon, FEP, coated glass | Leave it off only where nothing will be bonded or painted later |
| 5 | Perforated release film | Lets air, volatiles and some resin through its holes; stops the bleeder sticking to the part. | Film with holes of a set size and spacing | No-bleed prepreg: a solid film instead |
| 6 | Bleeder | Soaks up the excess resin and gives the air a path. More plies take more resin. | Glass cloth, nonwoven polyester, perforated PTFE-coated glass | No-bleed prepreg and edge-bleed wet layups: none |
| 7 | Solid release film | Stops the resin at the bleeder, so the breather stays dry and keeps breathing; protects a heat blanket. | Solid film | Bleedout method: left out (bleeder and breather are one) |
| 8 | Breather | Carries the vacuum over the whole bag to the port. It has to touch the bleeder. | Polyester felt: 4 oz below 50 psi, 10 oz for 50 to 100 psi | Autoclave pressure: the heavier weight |
| 9 | Vacuum bag | The airtight skin the atmosphere pushes on. | Nylon or similar film rated for the cure temperature; reusable silicone | Complex shapes: pleats in the bag, or a silicone bag |
| 10 | Sealant tape | Seals the bag to the part or the tool. | Tacky tape rated for the cure temperature | Envelope bag: the bag is sealed to itself |
| 11 | Vacuum port | Connects the pump. Sits on the breather, not on the repair. | Through-bag valve; hose that will not collapse | Two ports when a gauge reads the bag separately |
FAA-H-8083-31 Vol. 1 pp. 7-20 to 7-22 (caul plate, release agents, bleeder, peel ply, layup tapes, perforated and solid release film, breather weights, vacuum bag, vacuum equipment). The breather weights are the Handbook's; check every consumable's temperature rating against the cure.
Which bleed method
| Method | Use it for | Over the plies | What goes wrong |
|---|---|---|---|
| Bleedout | Wet layups and high-resin prepregs that need excess resin out | Perforated release film, then bleeder/breather | Too much bleed: dry, resin-starved laminate |
| Controlled bleed | Most heated repairs where the SRM gives bleeder plies | Perforated film, a counted number of bleeder plies, solid film, breather | Too many bleeder plies: resin-starved. Too few: resin-rich, heavy |
| No bleed | Prepregs with 32 to 35 % resin content (most high-strength prepregs) | Solid film taped at the edges with small gaps for air, then breather | Any bleed at all leaves the laminate short of resin |
| Edge (horizontal) bleed | Small room-temperature wet layups | No film on top; a 2 in edge breather strip around the repair | Squeegee left out: air and excess resin stay in the plies |
FAA-H-8083-31 Vol. 1 p. 7-29, bleedout technique, controlled bleed, no bleedout and horizontal bleedout. The manual or the resin's technical sheet decides which one applies.
Peel ply, properly
Peel ply is a sacrificial fabric cured as the outermost ply. When it is torn off it takes the surface skin with it and leaves a clean, rough face that is ready to bond or paint, without sanding. That is why it goes on every surface that will be bonded later: the next repair ply, a doubler, a hinge, a fairing.
Tear it off just before the next bond, not when the part comes out of the bag. Until then it protects the surface from hands, dust and release agent.
The Handbook prefers heat-set polyester, because it does not shrink in the cure. Nylon, FEP and coated glass peel plies exist too. Two cautions: peel ply is hard to remove if it is overheated, and some coated types leave a contamination that spoils the bond. If a surface will be bonded, use the peel ply the manual or the adhesive maker names.
Perforated, micro-perforated or solid film
All three are release films: nothing sticks to them. The difference is what gets through.
Perforated film has holes at a set size and spacing. The bigger and closer the holes, the more resin passes into the bleeder. The amount also depends on the bleeder thickness, the resin viscosity and temperature, and the vacuum.
Pin- or micro-perforated film has very small holes. It lets air and volatiles out but passes little resin. Use it where you want the laminate to breathe and lose almost no resin.
Solid film passes nothing. It goes on a tool or caul so the plies do not stick to it, over the bleeder in a controlled bleed, and straight on the plies in a no-bleed cure, taped at the edges with small gaps so the air can still leave sideways.
Film makers code their perforation patterns differently. Pick the pattern from the maker's data sheet against the bleed the manual asks for.
Bagging a flat repair, step by step
1. Plan the bag first. Cut every layer before mixing resin or thawing prepreg. Each layer goes 1 to 2 in past the one under it, and the breather reaches the port position.
2. Tape the seal. Clean the surface around the repair and lay sealant tape on it, a few inches outside the breather. Leave the backing paper on until the bag goes down.
3. Lay up the plies, then the peel ply, the perforated film and the bleeder plies the manual asks for. Then the solid film if it is a controlled bleed, and the breather over everything, touching the bleeder.
4. Place the port on the breather, off the repair so it does not print into the laminate. Put a doubled pad of breather under it.
5. Lay the bag loose, with pleats at the corners and over any contour, so it reaches every hollow without bridging. Peel the tape backing and press the bag on with no wrinkles across the tape.
6. Pull vacuum and check it. Close the valve and watch the gauge: if it drops, find the leak along the tape and pleats before the resin starts to gel. The Handbook's typical cure keeps at least 22 inHg through the cure; the SRM may ask for more.
7. Cure to the schedule in the manual, with thermocouples at the repair, and log time, temperature and vacuum.
For UAV, model and homebuilt work
The same stack works on a mould: release agent and solid film on the tool, peel ply on every face that will be glued later, then perforated film, bleeder, breather and bag. For small wet layups, edge bleed with a squeegee is often enough.
Two things catch people out. Bag films and tapes are rated for a temperature, and cheap substitutes soften or leak under heat. And a laminate cured at room temperature is not as strong as the original 250 °F or 350 °F cured part, so it is not a like-for-like repair on certified structure.
Questions people actually ask
Is peel ply the same as release film?
No. Peel ply is a fabric that bonds lightly to the laminate and is torn off to leave a bondable surface. Release film does not bond at all; it just separates layers.
Do I need a bleeder with prepreg?
Only if the prepreg is a bleed system. Prepregs with 32 to 35 % resin are usually no-bleed: no bleeder, solid film on top, and the manual or the material sheet will say so.
How many bleeder plies?
The SRM gives the number. As a rule, thicker laminates need more, and too many leave the repair resin-starved.
Why did my laminate come out dry and white?
Too much resin was bled off: too many bleeder plies, a film with too much open area, or a no-bleed prepreg bagged as if it bled.
Why are there voids even though I had vacuum?
The breather was not continuous to the port, the bag bridged a corner, or there was a slow leak. Check the vacuum with the pump valve closed before the resin gels.
Can I reuse the breather or the bag?
Film bags, bleeders and breathers are single use; a silicone bag can be reused. A breather that took resin no longer breathes.
Limits of this guide
What the sources support, and no further.
- The manual governs. Bleeder count, film type, vacuum level and cure come from the SRM or the material maker's sheet. This page explains the stack; it does not replace them.
- No perforation codes. Each film maker codes its patterns differently; we do not list them.
- Step sequence. The bag steps are the usual shop order built on the Handbook's materials and bleed methods; the Handbook does not print them as one numbered list.
Sources
- FAA-H-8083-31, AMT Handbook — Airframe, Volume 1, Chapter 7 — pp. 7-20 to 7-22, caul plate, vacuum bag materials, vacuum equipment; p. 7-29, bleedout, controlled bleed, no bleedout, horizontal bleedout; pp. 7-30 and 7-31, vacuum-assisted impregnation, single-side and envelope bagging; p. 7-38, minimum 22 inHg during the cure.