Blend-out, fastener and doubler
Where to buy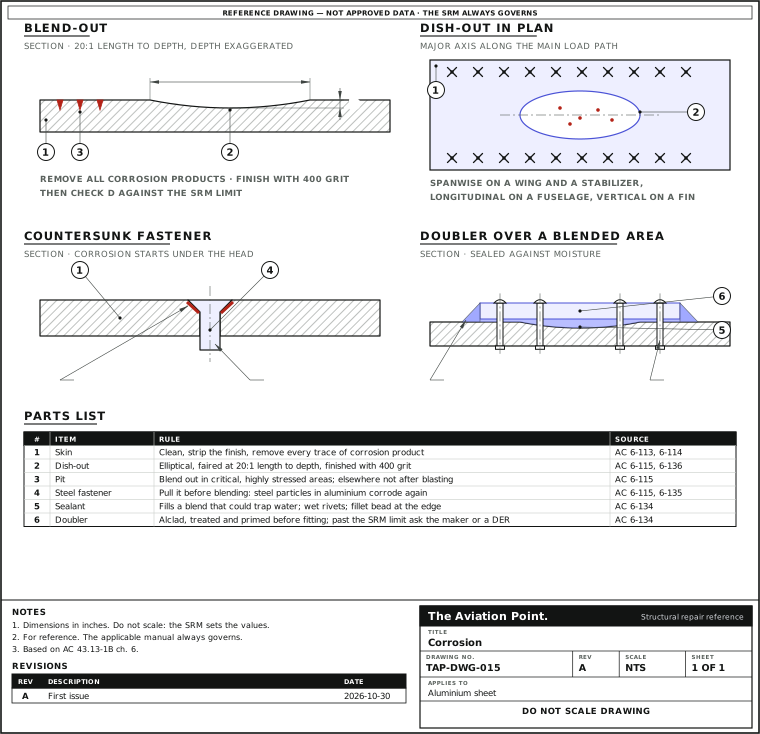
Rework corrosion, one step at a time
| Step | Action | What to do |
|---|---|---|
| 1 | Identify the metal | Confirm that it is aluminium. |
| 2 | Clean and strip | Clean the area and strip the finish. |
| 3 | Find the extent | Find how far the damage goes, and document it. |
| 4 | Remove the corrosion | Take light to moderate corrosion off by hand, with abrasive mat, cloth or paper. |
| 5 | Inspect | If corrosion remains after a second pass, go to a stronger method. |
| 6 | Blend | Blend at 20:1 through finer and finer papers. |
| 7 | Clean | Use dry cleaning solvent, never kerosene or other petroleum fuel. |
| 8 | Measure | Check the depth of the blended area against the rework limits. |
Eight types, by how they look
| Type | What you see | Remember |
|---|---|---|
| General surface | Dulling, then a rough, frosted surface over a wide area | Most common. Heat discoloration is not corrosion (6-12) |
| Pitting | White or grey powder; tiny pits once it is cleaned off | Can go deep: damage out of proportion to the surface (6-13) |
| Crevice | At joints, joint edges, under foreign material | A concentration cell, even between identical metals (6-14) |
| Filiform | Worm-like traces under the paint film | Humidity 78 to 90 %; polyurethane is susceptible (6-16) |
| Intergranular | Nothing at first: the grain boundaries are attacked | 2014 and 7075 if badly heat-treated (6-17) |
| Exfoliation | Surface grains lifted in layers | Advanced intergranular; mostly extrusions (6-18) |
| Galvanic | Build-up of corrosion where two different metals meet | Needs an electrolyte (6-19) |
| Stress corrosion | Cracks under steady or cyclic stress plus a damaging environment | Riveting, bolting, over-torque trap stress (6-20) |
AC 43.13-1B, paragraphs 6-12 to 6-20.
How much to remove
All of it. Repair means removing all corrosion and its products. If the damage is past the limits of the aircraft or parts manufacturer, the part is replaced. With no manufacturer limits, a DER must be consulted before the aircraft returns to service (6-113).
Shape. Fair each depression into a smooth, elliptical dish-out at 20:1, length to depth, with the long axis along the load path: spanwise on wings and horizontal stabilizers, longitudinal on fuselages, vertical on fins (6-115). A pit 0.010 in deep needs a dish-out at least 0.200 in long: the blend-out calculator does that arithmetic. Where pits sit close together, take out the metal between them.
Pits that stay. In critical, highly stressed areas, blend out every pit left after cleaning: it is a stress riser that can start stress corrosion cracking. In non-critical structure cleaned by abrasive blasting, you need not, because it would remove metal for nothing (6-115).
Steel in aluminium. Take out steel nutplates and fasteners before blending aluminium. Steel or copper particles left in the surface become a new corrosion point (6-115).
Rework, in order
1. Identify the metal as aluminium. 2. Clean and strip the finish. 3. Find the extent of the damage and document it (6-114, 6-136).
4. Remove light to moderate corrosion by hand with abrasive mat, cloth or paper, aluminium wool, fibre bristle brush or pumice. Stainless brush bristles must not exceed 0.010 in (6-136).
5. Inspect. If corrosion remains after a second pass, go to a stronger method, for instance chemical to mechanical. 6. Blend at 20:1 through finer papers up to 400 grit. 7. Clean with dry cleaning solvent, never kerosene or other petroleum fuel. 8. Measure the depth of the faired depression against the rework limits (6-136).
Choose abrasives from AC table 6-1: on clad aluminium sanding is limited to minor scratches, and silicon carbide is not used on non-clad aluminium alloys.
After the metal is clean
Treat and fill. If water can be trapped in the blended area, chemical conversion coat to MIL-C-81706 (the AC's reference) and fill it with structural adhesive or sealant to the original contour. A small area that has lost no significant strength needs nothing else before the protective finish (6-134).
Doubler. Alclad where available, anodized (preferred) or conversion coated after all cutting, drilling and countersinking. Drill, countersink, treat and prime the holes before it goes on; seal under it; set the rivets wet; leave a sealant fillet round the edge; paint after cure. Past the SRM limit, ask the manufacturer or a DER (6-134). Size the rivets with the doubler calculator.
Countersunk fasteners. Intergranular corrosion often starts at countersinks where steel fasteners sit in aluminium. Remove the fixed fastener, clear all corrosion, then conversion coat, prime and fit the fastener wet with sealant (6-135). The galvanic corrosion calculator compares metal pairs.
Questions people actually ask
Can I sand it off, prime it and carry on?
Only inside the SRM limit, and only after every trace of corrosion product is out and the area is blended and treated (6-115, 6-134). Past the limit, the repair design belongs to the manufacturer or a DER.
What if the SRM gives no corrosion limit?
Then the AC says a DER must be consulted before the aircraft or part returns to service (6-113).
Why pull the steel fastener before blending?
Steel or copper particles smeared into aluminium become the next corrosion point, and corrosion often hides under the head of a countersunk steel fastener (6-115, 6-135).
How do I remove filiform?
The AC names glass-bead blasting with portable equipment or sanding. Left alone it can turn into intergranular corrosion, especially at fasteners and seams (6-16).
Limits of this guide
What the sources support, and no further.
- No depth limit is given. How deep a part may be blended comes from its SRM.
- Aluminium only. Magnesium, steel and titanium have their own methods in AC 43.13-1B chapter 6.
- Products are not named beyond what the AC names; use those the SRM approves.
Where to buy
Distributors coming soon.
Sources
- AC 43.13-1B with Change 1 — Acceptable Methods, Techniques, and Practices — Chapter 6: paragraphs 6-12 to 6-20, types of corrosion; 6-113 to 6-115, assessing and reworking; 6-134 to 6-136, aluminium sheet metal.
- FAA-H-8083-31, AMT Handbook — Airframe, Volume 1, Chapter 4 — p. 4-90, scratches through the pure aluminium layer of Alclad.