Plan, section, doubler fitting and panel repair
Where to buy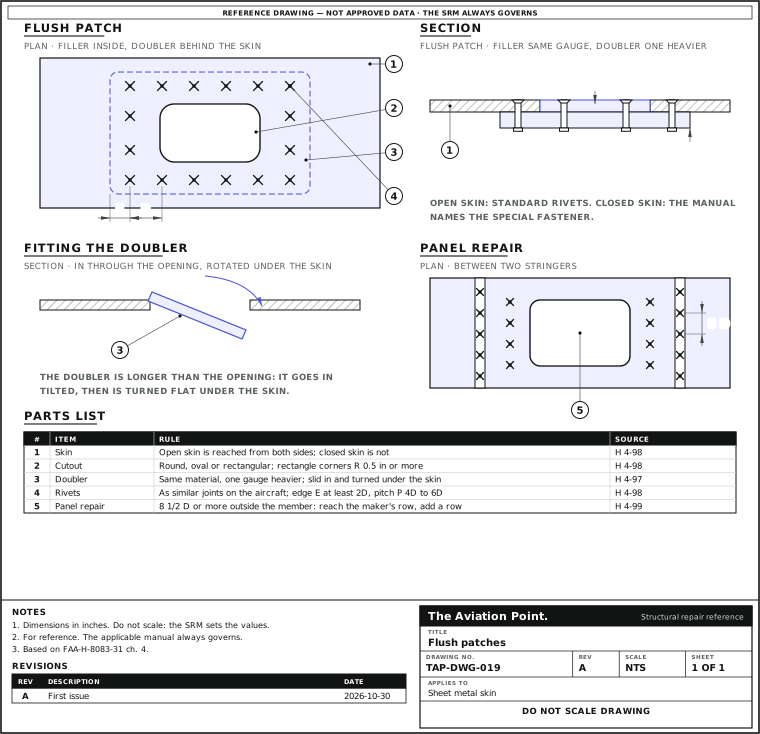
Build a flush patch, one step at a time
| Step | Action | What to do |
|---|---|---|
| 1 | Remove the damage | Cut to a round, oval or rectangular shape, and round every corner of a rectangle. Fold earlier repairs in the area into the new one. |
| 2 | Make the parts | The filler is the same material and gauge as the skin. The doubler is one gauge heavier. |
| 3 | Fit the doubler | It is longer than the cutout. Slide it in tilted, then rotate it until it lies flat under the skin. |
| 4 | Drill and fasten | Drill one hole and clamp it. Find the second with a hole finder, then drill the rest. Deburr every hole and protect the touching faces. |
| 5 | Rivet | Use standard rivets where the skin is open to both sides. In closed skin, the maker names the special fastener. |
Which skin repair
| Repair | Use it when | Source |
|---|---|---|
| Lap patch | Aerodynamic smoothness is not important; patch sits on the skin | H 4-97 |
| Flush patch | A smooth surface is needed; filler plus inside doubler | H 4-97, 4-98 |
| Panel repair | Damage too large for a standard patch, or beside stringers and frames | H 4-99 |
| Panel replacement | Damage beyond repairable limits, or too many earlier repairs in the area | H 4-99 |
| Pressurised skin | Highly stressed: needs more rivets than a non-pressurised repair; follow the maker | H 4-101 |
H = FAA-H-8083-31 Vol. 1 page. For the lap patch see the patches guide.
Which repair fits?
The skin must stay smooth, and the damage is small enough for a standard patch. Which repair fits?
- Lap patch
Not this one. A lap patch sits on the skin. Use it where aerodynamic smoothness is not important.
- Flush patch
Best fit. A filler plus an inside doubler keeps the surface smooth.
- Panel replacement
Not this one. That is for damage beyond repairable limits, or too many earlier repairs in the area.
On a real job, the SRM decides.
Building it
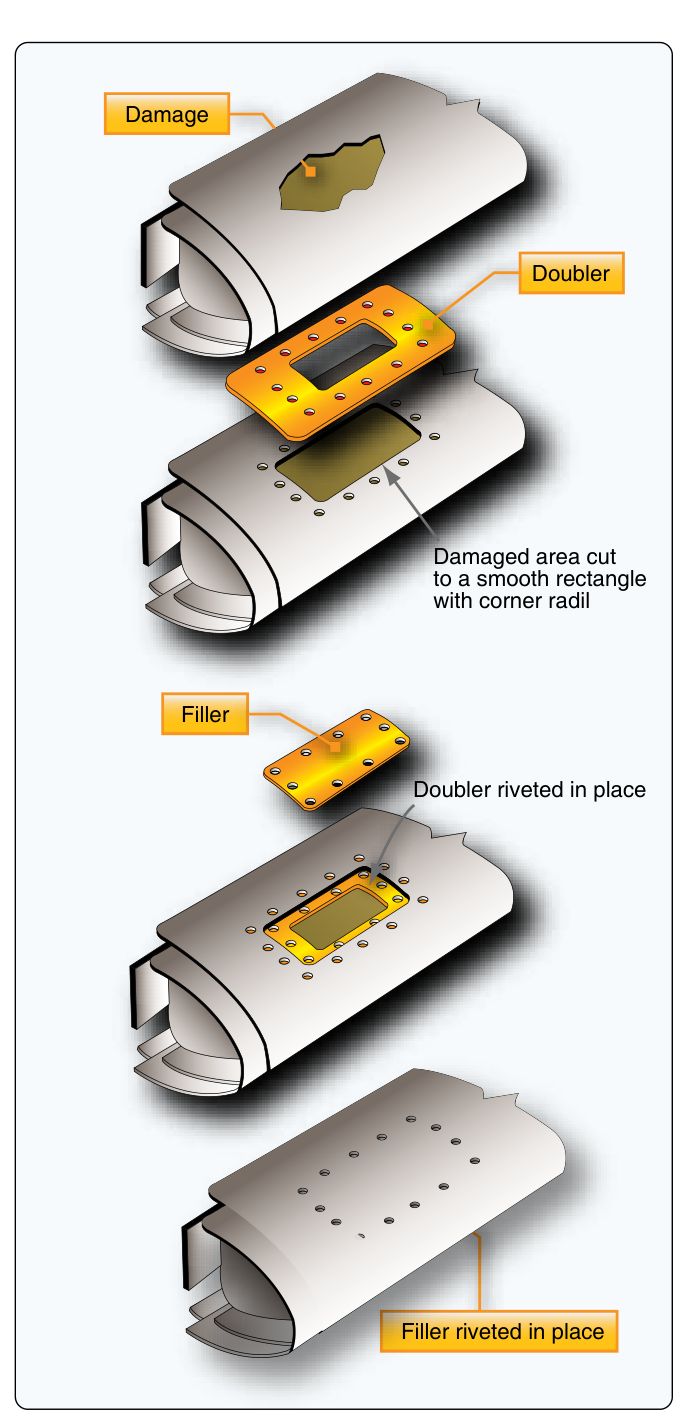
1. Remove the damage. Cut to a round, oval or rectangular shape. Round every corner of a rectangle to a radius of at least 0.5 in (H 4-98). Clean up distorted skin, round all square corners and fold earlier repairs in the area into the new one.
2. Make the filler from the same material and gauge as the skin, and the doubler one gauge heavier (H 4-97). Doubler size follows the edge distance and the rivet pitch.
3. Fit the doubler. It is longer than the cutout: slide it in tilted and rotate it until it lies flat under the skin (H 4-97).
4. Drill and fasten. Drill one hole and clamp with a fastener, find the second with a hole finder, then drill the rest through the original holes. Deburr every hole and put corrosion protection on the touching faces before riveting (H 4-99).
5. Rivet. Standard rivets where the skin is open to both sides; in closed skin the maker names the special fastener (H 4-98). A countersunk patch needs the dimple or countersink right for the skin gauge; see the countersink or dimple calculator.
Rivets: edge distance and pitch
Rule. Minimum edge distance 2D; pitch 4D to 6D; same size and type as similar joints on the aircraft (H 4-98). For a 1/8 in rivet that is 0.25 in edge distance and 0.50 to 0.75 in pitch (arithmetic from the rule). Count and lay out in the doubler calculator and the rivet spacing calculator.
Panel repair (H 4-99): with 8 1/2 rivet diameters or more of material left outside the member, extend the patch to the maker's rivet row and add a row inside. With less, patch over the member and add a row outside it. A damage at a panel edge gets one row along the edge unless the maker used more. The new row has about 5D pitch, staggered with the maker's; the patch plate is the original thickness or the next greater, with 2 1/2 D edge distance, arcs at the corners of radius equal to the edge distance, and its edges chamfered 45 degrees and turned down to fit.
Oversize rivets. If a hole must go oversize, the oversize and standard rivet share the same head; a countersunk hole can take the NAS1097 reduced-head rivet, whose head is one size smaller, if the manual authorises it. Keep the edge distance for the larger rivet. See rivet replacement.
Questions people actually ask
Why is the doubler one gauge heavier?
The Handbook specifies it for the flush patch: the filler is the same gauge as the skin and the doubler one heavier (H 4-97).
Can I use a square cutout?
Only with corner radii of at least 0.5 in. Round or oval is better: cracks start in square corners (H 4-98).
Is this valid for pressurised skin?
No. Pressurised skin takes more rivets and the maker's data (H 4-101).
When do I replace the panel?
When damage exceeds the repairable limits, or the section already has too many repairs (H 4-99).
Limits of this guide
What the sources support, and no further.
- No patch or doubler size is given. It follows from the rivet count and the SRM.
- Typical only. The figures are examples, not authority.
- Not pressurised skin or primary structure without the manufacturer's data.
Where to buy
Distributors coming soon.
Sources
- FAA-H-8083-31, AMT Handbook — Airframe, Volume 1, Chapter 4 — p. 4-97, lap patch and flush patch; p. 4-98, fig. 4-176, patch for a non-pressurised area, open and closed skin; p. 4-99, panel replacement and repair; p. 4-101, pressurised area.