Honeycomb repair, view by view
Where to buy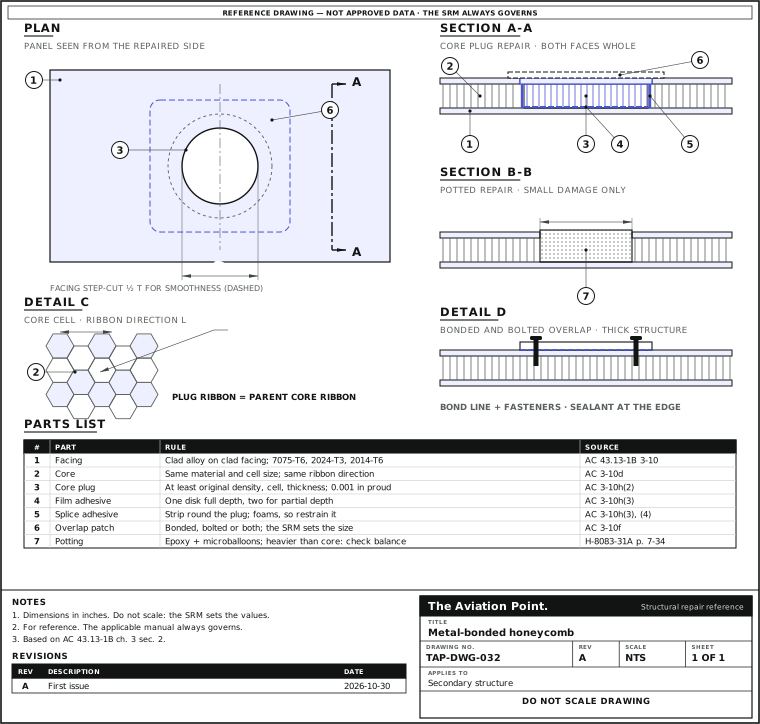
Replace the core, one step at a time
| Step | Action | What to do |
|---|---|---|
| 1 | Locate the damage | Use tapping or other non-destructive testing. |
| 2 | Remove it | Route the facing with a template so the good skin is not cut. Peel old core from a thin skin carefully. |
| 3 | Dry it | Remove water from the core before you repair. The method and temperature are the SRM's. |
| 4 | Fit the plug | Match the density, cell size, ribbon direction and thickness. Trim the sides to a loose fit. |
| 5 | Add the adhesive | Use film adhesive and a strip of core splice adhesive round the perimeter. It foams up and out, so restrain it. |
| 6 | Cure and trim | Cure to the manufacturer's data, then trim flush. |
Match the repair to the damage
| Damage | Repair | Source |
|---|---|---|
| Dent, scratch or fracture up to 1/4 in in an aluminium facing | Viscous epoxy filler. A delaminated dent is repaired, not filled. A fracture also gets a surface patch | AC 3-10a |
| Core damaged, 1 in or less | Potting (the Handbook says under 0.5 in); heavier than the core | AC 3-10g; HB p. 7-34 |
| Core and one facing damaged | Route out facing and core, core plug with film adhesive, new facing | AC 3-10b, 3-10h |
| Through both facings | As a laminate repair, access to both sides | AC 3-10c |
| Thick structure, many loads | Overlap patch: bonded, bolted, or both | AC 3-10f |
AC 43.13-1B pars. 3-10a to 3-10h (pp. 3-9 to 3-12); FAA-H-8083-31A p. 7-34. The two limits for potting differ: use the SRM figure.
Compare the repairs side by side
Potting
- Fits
- Small core damage.
- What you do
- Fill all cells, work the bubbles out, overfill slightly, cure and trim flush.
- The catch
- It does not restore full strength, and it is denser than the core it replaces.
Core plug
- Fits
- Core and one facing damaged.
- What you do
- Route out the facing and core, fit a core plug with film adhesive and add a new facing.
- The catch
- The plug must match the material, cell size and ribbon direction.
Overlap patch
- Fits
- Thick structure with many loads.
- What you do
- Bond the patch, bolt it, or both.
- The catch
- Spacing, diameter, number of fasteners and sealant all need care.
The SRM gives the repair.
Replacing the core
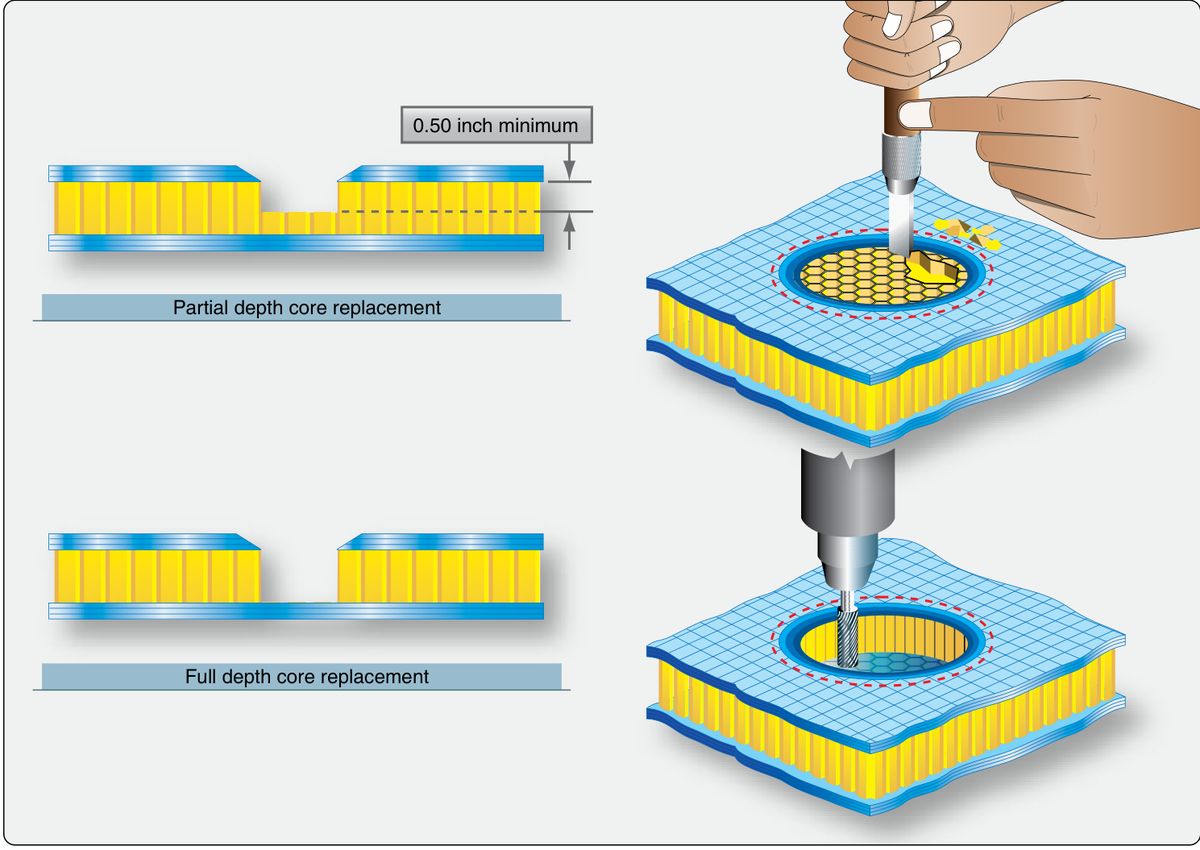
Locate the damage first by tapping or other non-destructive testing, then remove the damaged facing and the core it affects (AC 3-10d). Route the facing with a template so the good skin is not cut; on a tapered part such as an aileron, use a wedge block under the template so the cut runs parallel to the lower skin (AC 3-10g(1)).
Same core. The replacement has the same material, cell size and ribbon (grain) direction as the original. Glass-fabric or wood core may stand in for aluminium core only where the repair allows it (AC 3-10d).
Plug. Density, cell size, ribbon direction and thickness at least as the original. Trim the sides to a loose fit and the height to 0.001 in above the surface, because the core compresses and sets in the cure (AC 3-10h(2)).
Adhesive. One film disk for a full-depth plug, two for partial depth, and a strip of core splice adhesive round the perimeter. The splice adhesive foams up and out, so restrain it, for example under vacuum bag. Cure to the manufacturer's data, trim flush (AC 3-10h(3) to (5)).
Handling. Latex gloves for film adhesive and prepared surfaces. Peel the old core from a thin skin carefully: pulling can damage it (AC 3-10h CAUTION).
Dry it before you bond it
Check round the damage for water, oil, fuel and dirt, using tap test, X-ray, back light or a moisture detector. Remove water from the core before repairing. If it stays, it boils in the elevated-temperature cure and blows the facings off the core; frozen at altitude it can disbond them (FAA-H-8083-31A pp. 7-34 to 7-35). The Handbook dries the area under vacuum bag and heat blanket: the method and temperature are the SRM's.
Potting, and its weight
Potting is epoxy filled with microballoons, cotton or flox. It does not restore full strength (HB p. 7-34). It also works as a hard point for bolts and screws in a panel.
It is heavy. Potting is denser than the core it replaces, which can upset the balance of a flight control. Work out the weight of the repair and compare it with the balance limits in the SRM (HB p. 7-34). The core potting calculator gives the volume to mix.
Limit. AC 43.13-1B allows potting for damage of 1 in or less; the Handbook says smaller than 0.5 in. Where the numbers disagree, the SRM figure decides.
Fill all cells, work bubbles out with a toothpick, overfill slightly, cure to the manufacturer's data and trim flush (AC 3-10g(2), (3)).
Facings, finish and edges
Alloys. 7075-T6, 2024-T3 and 2014-T6 are common for aluminium facings. Use clad sheet on clad facings for the best corrosion resistance. Magnesium, titanium or stainless facings need special procedures that the AC does not cover (AC 3-10).
Smooth surface. Where aerodynamic smoothness matters, step-cut the facing round the repair cavity to half its thickness, with a router, end mill and template (AC 3-10b).
Overlap patches may be bonded, bolted or both. Bolted or blind-riveted repairs are mainly for thick structure; the concerns are spacing, diameter, number of fasteners and sealant (AC 3-10f).
Finish. Metal-faced laminates are finished for corrosion protection. The surface must be clean, free of voids and smooth, and the edges not covered by a bonded patch must be sealed against moisture (AC 3-11). See protecting a repair.
Questions people actually ask
Can I use the same repair on any panel?
No. The AC and the Handbook both say the steps are general and not a substitute for the aircraft SRM. One manufacturer's method does not carry over to another's.
Is this primary structure?
The AC section is for secondary structure. Primary honeycomb needs the manufacturer's data.
Can I just bolt through the panel?
Soft-core sandwich is sensitive to fastener clamp-up force; the Handbook describes a fastener system made for it (p. 7-46) and potted hard points (p. 7-34). Use what the SRM shows.
Limits of this guide
What the sources support, and no further.
- No size, cure or temperature is given. Those are the SRM's and the adhesive maker's.
- Secondary structure only (AC 43.13-1B sec. 2).
- Potting limits disagree between the AC (1 in) and the Handbook (0.5 in): take the SRM's.
Where to buy
Distributors coming soon.
Sources
- FAA AC 43.13-1B CHG 1, Chapter 3, Section 2 — Pars. 3-10 and 3-11, pp. 3-9 to 3-12, Figs. 3-10 to 3-16: metallic sandwich secondary structure repairs, core replacement, potting, finishing.
- FAA-H-8083-31A, AMT Handbook — Airframe, Volume 1, Chapter 7 — pp. 7-34 to 7-35: minor core damage, potted repairs, removing water, removing the damage.