A core plug repair, in section and plan
Where to buy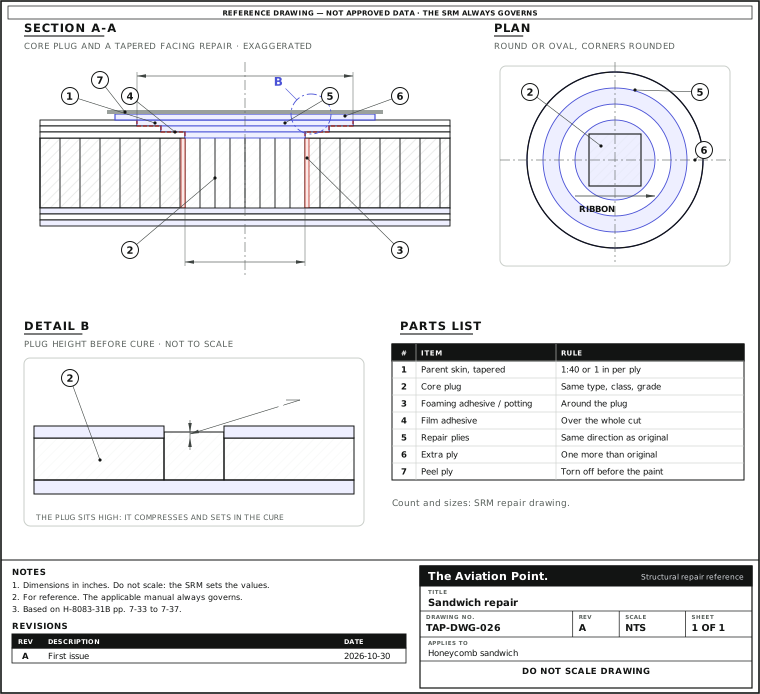
Core plug and skin: the eight steps
| Step | Action | What to do |
|---|---|---|
| 1 | Inspect | Tap thin skins to map the damage. Look around it for water, oil, fuel or dirt. |
| 2 | Dry it | Water in the core boils in a hot cure and blows the skin off, and it can freeze aloft. |
| 3 | Remove the damage | Cut to a smooth round or oval outline with rounded corners, without cutting the good plies. Take the core out to the same outline. |
| 4 | Sand the taper | Make a uniform taper, then strip the finish and any conductive coating past it. Clean with approved solvent. |
| 5 | Install the core | The plug is the same type, class and grade as the original, with its cells lined up with the surrounding core. |
| 6 | Lay the repair plies | Material and count come from the SRM. Each ply goes in the original's direction. |
| 7 | Bag | Bag the repair for the cure. |
| 8 | Cure | Wet layup and prepreg cure differently. The core is usually cured in its own cycle before the patch. |
Which repair for which damage
| Damage | Repair | Source, and the catch |
|---|---|---|
| Small core damage, under 0.5 in (Handbook) or up to 1 in (AC) | Pot it: fill with epoxy potting compound, with or without removing the core | Handbook p. 7-34; AC para. 3-10g. Potted repairs do not restore full strength; the compound is heavier than core |
| Dent, scratch or fracture in an aluminium facing up to 1/4 in | Fill with viscous epoxy; a fracture also gets a surface patch | AC para. 3-10a. A delaminated dent is repaired, not filled |
| Through one skin and into the core | Remove skin and core, install a core plug, patch the skin | Handbook pp. 7-34 to 7-37; AC para. 3-2b(3), 3-10h |
| Through both skins | Repair as a laminate, from both sides if both are accessible; the second side after the first has hardened | AC paras. 3-2b(3), 3-3b(4), 3-10c |
| Skin disbonded from the core, skin sound | Resin injection through drilled holes, on lightly loaded structure | Handbook p. 7-39. It cuts fibres, makes moisture hard to remove and may not fill completely |
| Damage too large for these | Overlap patch, bonded, or bolted or blind-riveted on thick structure | AC para. 3-10f. SRM or engineering decides |
The two potting limits differ by source. Take the one in your SRM. A repair is temporary, interim (restores strength, not durability, with its own inspection interval) or permanent (Handbook p. 7-33): the SRM names which one it is.
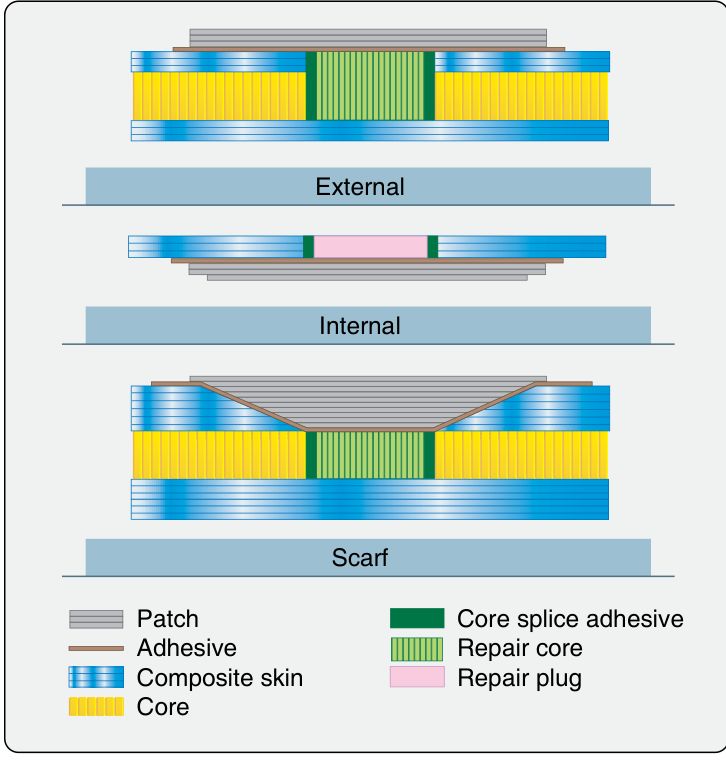
Compare the repairs side by side
Potting
- Fits
- Small core damage.
- What you do
- Fill with epoxy potting compound, with or without removing the core.
- The catch
- It does not restore full strength, and the compound is heavier than core.
Core plug
- Fits
- Damage through one skin and into the core.
- What you do
- Remove skin and core, install a core plug and patch the skin.
- The catch
- The core must be dry first.
Resin injection
- Fits
- A skin disbonded from the core while the skin is sound, on lightly loaded structure.
- What you do
- Inject resin through drilled holes.
- The catch
- It cuts fibres, makes moisture hard to remove and may not fill completely.
The SRM names the repair. Potting limits differ between sources, so use the SRM's.
Potting: small, quick, heavier
Potting compound is usually epoxy filled with hollow glass, phenolic or plastic microballoons, cotton or flox. The AC mixes the filler to the maker's ratio, fills every cell, and works the bubbles out with a toothpick; an overlay repair is filled slightly above the surface, a flush repair slightly above the original core (para. 3-10g).
Weight matters on a control surface. The compound is heavier than the core, so the Handbook says to calculate the repair weight and compare it with the balance limits in the SRM (p. 7-34). Potting is also how hard points for bolts and screws are made.
Core plug and skin: the Handbook's eight steps
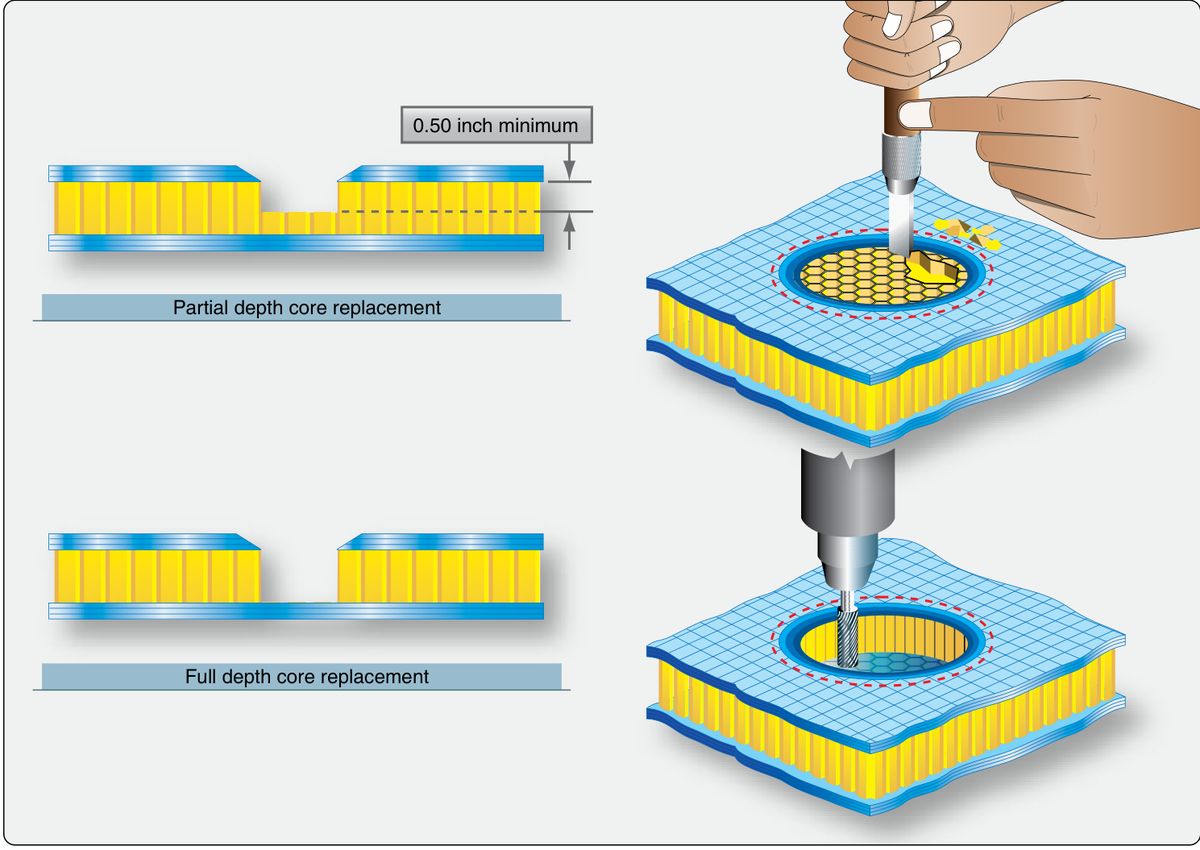
1 Inspect. Tap thin skins to map the damage; look around for water, oil, fuel or dirt. 2 Dry it. Water in the core boils in an elevated cure and blows the skin off, and can freeze aloft (p. 7-35). 3 Remove the damage to a smooth round or oval outline with rounded corners, without cutting the good plies; take the core out to the same outline.
4 Taper sand a uniform taper: some makers give a ratio such as 1:40, others about 1 in of overlap per ply of skin. Strip the finish and conductive coating for at least 1 in beyond the taper, and clean with approved solvent (pp. 7-35 to 7-37).
5 Install the core. The plug is the same type, class and grade as the original, with its cells lined up with the surrounding core, trimmed to length, solvent-washed and touching the sides of the hole. Wet layup: two plies of fabric on the inside of the good skin, potting round the plug. Prepreg: film adhesive under it and foaming adhesive round it (p. 7-36). The AC cuts the plug so its top sits .001 in proud of the surface, because the core compresses and sets in the cure (para. 3-10h(2)).
6 Repair plies. Material and count from the SRM, typically one more ply than the original, each in the original's direction, smallest first. 7 Bag and 8 cure: wet layup at room temperature or up to 150 °F; prepreg at 250 or 350 °F. The core is usually cured in its own cycle before the patch (pp. 7-35 to 7-37).
Repairing the skin around it
The skin patch is a laminate repair. The plies, direction, order, extra ply and overlap are the ones in the repair plies guide; cure, thermocouples and vacuum are in the cure guide.
The AC's glass-fabric scarf repair for a sandwich facing: scarf back about 50 times the thickness of the face ply, overlap each patch at least 1/2 in, and add an extra ply (para. 3-3a). Its stepped repair removes one ply at a time, each layer 1 in beyond the one below (para. 3-3b). These are for non-structural fiberglass; not for radomes, carbon or Kevlar (para. 3-2).
Core removal on thin skins: peel the core carefully, because pulling on it can damage the skin (AC para. 3-10h(1)). Use a router template so the cutter cannot touch the good skin (para. 3-10g).
For UAV, model and homebuilt work
A foam or honeycomb wing skin dented by a hard landing is usually a core plug and a patch. The common mistakes are repairing over a wet core, using a plug of the wrong density or cell direction, and filling with a heavy mix on a control surface. Dry it, match the core, and weigh what you add.
Questions people actually ask
When can I pot instead of replace the core?
For small damage: under 0.5 in in the Handbook, 1 in or less in the AC. Potting does not restore full strength (Handbook p. 7-34; AC para. 3-10g).
Why dry the panel before repairing?
Water boils in an elevated cure and can blow the skin off the core; it can also freeze at altitude and disbond the skin (Handbook p. 7-35).
Can I use any honeycomb for the plug?
No. The plug is the same type, class and grade as the original, with its cells lined up with the surrounding core (Handbook pp. 7-35 to 7-37; AC para. 3-10d).
Does the plug cure with the patch?
Usually not: the core replacement is cured in a separate cycle, then the plug is sanded flush before the plies go on (Handbook pp. 7-35 to 7-37).
Limits of this guide
What the sources support, and no further.
- The manual governs. Damage limits, repair class, materials, taper, plies and cure come from the SRM; these steps are general.
- Two potting limits. The Handbook and the AC differ (0.5 in and 1 in); use the SRM's.
- No weights. The balance check for a control surface is the SRM's; this guide gives no values.
- Not covered. Foam-core repair, metal-bonded honeycomb, inserts and lightning-protection mesh.
Where to buy
Distributors coming soon.
Sources
- FAA-H-8083-31B, AMT Handbook — Airframe, Volume 1 (2023), Chapter 7 — p. 7-33, temporary, interim and permanent repairs; pp. 7-34 to 7-37, potting, the eight steps of a core replacement, figures 7-56 to 7-62; p. 7-39, resin injection repairs.
- AC 43.13-1B, Change 1, Chapter 3, Fiberglass and Plastics — paras. 3-2b to 3-3b, facing repairs; para. 3-10, repairs to metallic sandwich secondary structure: filler, core replacement, overlap repairs, core potting, core plug (paras. 3-10a to 3-10h).