A mould from a pattern, and the layup on it
Where to buy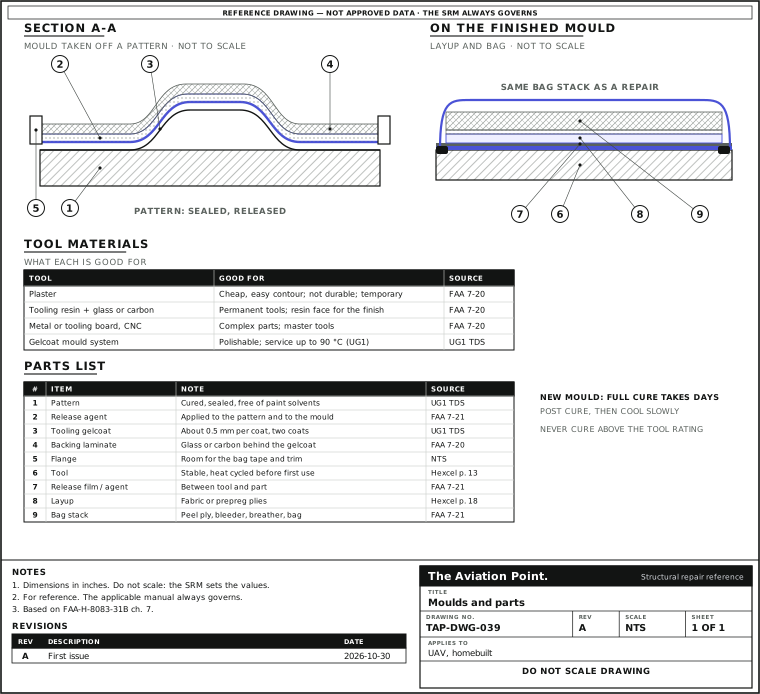
Make a mould, one step at a time
| Step | Action | What to do |
|---|---|---|
| 1 | Prepare the pattern | It is the shape of the part, so every flaw on it is copied. It must be fully cured, sealed and released before anything goes on it. |
| 2 | Check the surface | Fresh paint and filler can spoil the release. Make a small test patch before the real mould. |
| 3 | Gelcoat | This is the face of the mould. Follow the coats and times on the maker's sheet, and mix only what the pot life lets you use. |
| 4 | Backing | Build the body of the mould with glass or carbon laminate in tooling resin. Add flanges for the bag tape and for trimming the part. |
| 5 | Cure properly | Follow the maker's cure and post cure, cool slowly to avoid distortion, and support the mould during it. |
| 6 | Release the pattern | Demould carefully, then release, polish and heat-cycle the mould before the first part. |
Making a mould, in order
1. The pattern. It is the shape of the part, so every flaw on it is copied into the mould. It must be fully cured, sealed and prepared with a release agent before anything goes on it (Easy Composites UG1 data sheet).
2. Check the pattern surface. Fresh paint, filler primer and polyester body filler can leach solvent and spoil the release; styrene in a polyester or vinylester gelcoat can also soften a paint finish. The maker's advice is a small test patch before the real mould, and oven-cured industrial paint is the safe case (UG1 data sheet).
3. Gelcoat. The face of the mould. In the UG1 system: two coats of about 0.020 in (0.5 mm) each, each left to cure 4 to 8 hours at 20 °C before the next. Mix by weight at the catalyst percentage on the sheet (2 to 3 % MEKP for UG1) and mix only what the pot life lets you use (UG1 data sheet).
4. Backing. Glass or carbon laminate in tooling resin builds the mould's body. Tooling resins are used to impregnate fibre reinforcement to make permanent tools (FAA-H-8083-31B p. 7-20). Add flanges, for the bag tape and for trimming the part.
5. Cure the mould properly. A mould cured at room temperature is handleable early but takes at least 7 days to reach full properties in the UG1 system, and the maker recommends a stepped post cure, 24 hours after room-temperature cure, then a slow cool-down in the oven to avoid distortion. Support the mould during it (UG1 data sheet).
6. Release the pattern. Demould carefully, then release, polish and heat-cycle the mould before the first part. Hexcel advises a simple, stable tool with uniform pressure on the part, and heat cycling any new tool to relieve stress (Prepreg Technology FGU 017c, p. 13).
Which tool material
| Material | Good for | Limit | Source |
|---|---|---|---|
| Plaster | Contour tooling that is cheap and easy to make; can be filled with fibreglass or hemp | Not very durable: a temporary tool. A fibreglass-epoxy layer on the tool face improves the finish | FAA-H-8083-31B p. 7-20 |
| Tooling resin with glass or carbon | Permanent tools | Tool rating limits the cure temperature | FAA-H-8083-31B p. 7-20 |
| Metal or high-temperature tooling board, 5-axis CNC | Complex parts; master tools for aircraft parts | Machining cost | FAA-H-8083-31B p. 7-20 |
| Filled vinylester gelcoat system (Uni-Mould UG1) | Hard-wearing, polishable moulds for epoxy, polyester or vinylester parts | Service up to 90 °C; styrene system, so test the pattern | Easy Composites UG1 data sheet |
Oven and autoclave cures need support tooling because the parts deform without it (Handbook p. 7-20). The tool's rated temperature must be above the cure temperature.
Laying up on the mould
Release first. Release agents let the part come off the tool or caul plate (Handbook p. 7-21). Apply with a brush, pad or cloth, and keep release off the prepreg; Hexcel's order of work is release, then layup, then bag (FGU 017c p. 18). Check the agent suits your resin: the maker's sheet says.
Then the plies on the mould face, built as the repair would be: the wet layup guide and repair plies guide give the ply order and orientation, and the laminate plies calculator the count for a thickness.
Then the bag. Peel ply, perforated film, bleeder, breather and bag are the same stack as on a repair: see the vacuum bagging guide. The cure guide covers temperature and time.
Infusion. In vacuum infusion the dry reinforcement is bagged first and the resin is drawn through it by vacuum. The Handbook describes the small-scale version, impregnating fabric inside a bag with sealing tape at least 4 in beyond the material, an edge breather 1 to 2 in wide, solid film above and below, and says it reduces trapped air and gives a better resin-to-fibre ratio than squeegeeing (pp. 7-30, 7-31). The flow media, resin lines and gate layout for a full part are not in the FAA text we use: follow the resin maker's infusion guide.
For UAV and homebuilt work
A mould earns its cost when you make more than one part, or when the finish matters. If you take a mould from an existing part, treat the part as a pattern: seal it, release it and test the paint first.
Two cautions. A styrene gelcoat and its catalyst need the precautions in the safety guide. And a laminate cured at room temperature on a low-rated tool does not match a 250 °F or 350 °F cured part; for a primary structure the repair or build data sets the process.
Questions people actually ask
Do I need a gelcoat?
It gives a hard, polishable mould face. The mould maker's system (for UG1, gelcoat, coupling coat and tooling resin) is a set: do not mix parts from several systems without checking they are compatible.
Why does the part stick?
Usually release: a pattern with fresh paint, too thin a release coat, or a new mould whose gelcoat has not cured. A small test first costs less than the mould.
Can I cure a prepreg part on a gelcoat mould?
Only if the mould is rated for the cure temperature. UG1 is rated to 90 °C (194 °F), below a 250 °F cure. Check the rating of any mould before a heated cure.
Plaster, board or composite?
Plaster for a quick temporary tool, tooling resin laminate for a lasting one, machined board or metal for complex master tools (Handbook p. 7-20).
Limits of this guide
What the sources support, and no further.
- The manual governs. A repair tool for an aircraft part follows the SRM or the maker's drawing.
- One gelcoat system. Coat thickness, times and post cure are from the Uni-Mould UG1 data sheet as an example. Another maker's system will differ: use its sheet.
- No full infusion process. We give the Handbook's small-scale vacuum impregnation only.
- Hexcel text. Only the lines cited from the prepreg manual are used; its figures on tool design are not reproduced.
Where to buy
Distributors coming soon.
Sources
- FAA-H-8083-31B, AMT Handbook — Airframe, Volume 1, Chapter 7 — pp. 7-20, support tooling and molds; p. 7-21, release agents; pp. 7-30 and 7-31, vacuum-assisted impregnation.
- Hexcel, Prepreg Technology, Publication FGU 017c (January 2013) — p. 13, tool design and heat cycling new tools; p. 17, vacuum bag layers; p. 18, apply mould release, then lay up.
- Easy Composites, Uni-Mould Tooling Gelcoat UG1, Technical Datasheet (3 pages) — Pattern compatibility; mix ratio; two coats of about 0.020 in (0.5 mm); pot life, cure and post-cure schedule; service to 90 °C.