The cure set-up and the profile
Where to buy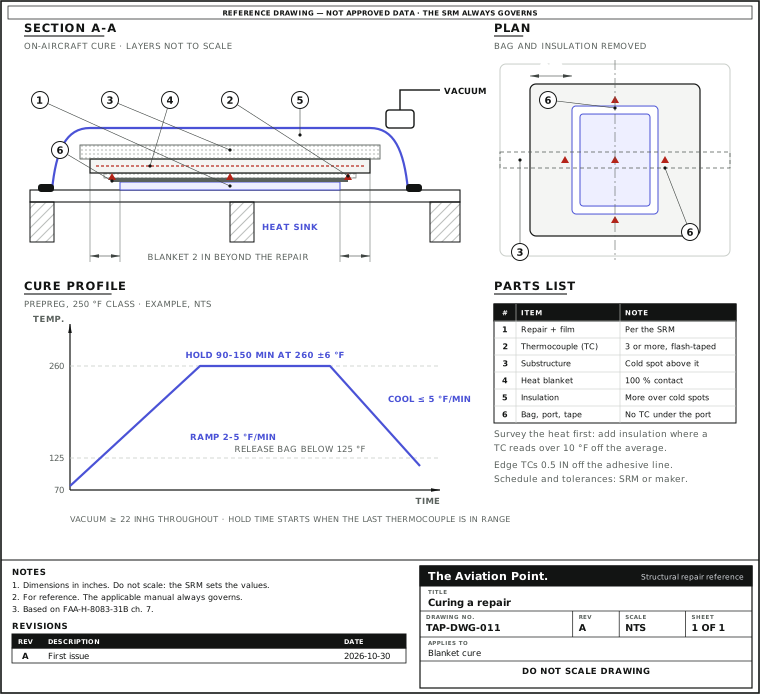
Run a cure, one step at a time
| Step | Action | What to do |
|---|---|---|
| 1 | Survey the heat | Do a thermal survey on a patch of the same material and thickness. Add insulation where a reading is off, more over cool spots and less over hot ones. |
| 2 | Fit the thermocouples | Follow the thermocouple rules below, and protect each tip with flash tape. |
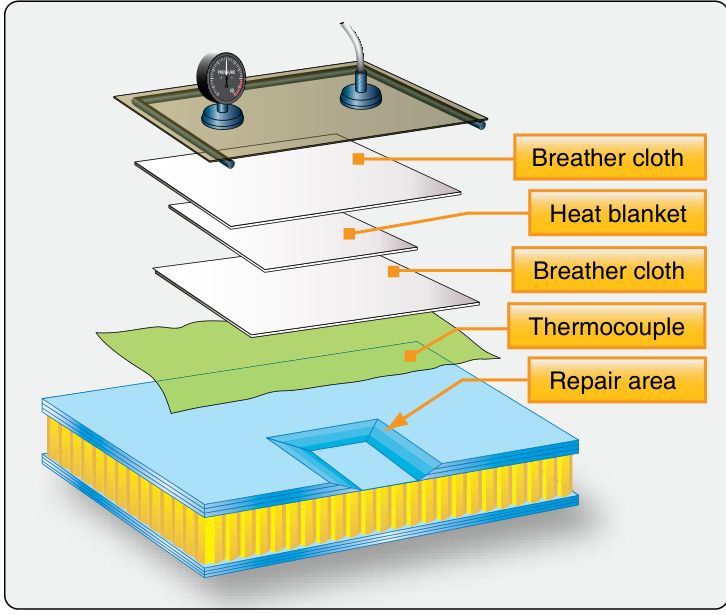
| 3 | Bag and blanket | The blanket needs full contact to pass its heat in, and the bag pressure gives that contact. |
| 4 | Ramp up | Raise the temperature at the rate the SRM or the material sheet gives. |
| 5 | Hold | The hold starts when the last thermocouple is in range. Keep the vacuum on through the whole cure. |
| 6 | Cool down | Bring the temperature down at the given rate, then release the bag and remove the layup at the temperature the schedule allows. |
| 7 | Keep the record | All time and temperature requirements must be met and documented. A hot bonder can print or upload the cure data. |
Heat sources for a repair
| Source | Good for | Watch |
|---|---|---|
| Heat bonder | On-aircraft cures: it controls the heat from thermocouples and runs the vacuum | Up to 10 thermocouples; it prints or uploads the cure record |
| Heat blanket | The usual on-aircraft heater; run with a bonder | Heat goes in by conduction, so it needs 100 percent contact, which the bag pressure gives |
| Heat lamp | Large or irregular surfaces under thermostat control, without a bag | Not effective above 150 °F or over about two square feet; hard to control |
| Hot air | Small repairs and drying the repair area | Insulated enclosure round the bagged repair |
| Oven, autoclave | Parts that come off the aircraft | The part, not the oven air, sets the cure: put thermocouples on the part |
FAA-H-8083-31B pp. 7-22 to 7-24, 7-33. AC 43.13-1B p. 3-7: cover the blanket to cut heat loss, separate it from the bag by glass cloth, and use a pressure plate if two blankets share one repair.
Thermocouple rules
| Rule | Detail |
|---|---|
| How many | Never fewer than three on a heating cycle |
| Precured patch | One near the centre of the patch |
| Perimeter | About 0.5 in away from the edge of the adhesive line |
| Control thermocouple | Not beyond the blanket's 2 in overlap of the repair, or the controller chases the cold reading |
| Protect | Flash tape above and below each tip against resin and shorts |
| Keep clear | Not under the vacuum port; wires not crossing or beside the blanket power cord |
| Slack | Leave slack under the bag so vacuum does not pull the tip away |
| Wire | Type J or K to match the equipment; Teflon insulation to 390 °F, Kapton above |
FAA-H-8083-31B pp. 7-24 and 7-25.
Survey the heat first
Substructure under the repair is a heat sink: it leaves a cold spot above it, while thin skin overheats quickly and thick skin soaks slowly (Handbook p. 7-25).
The Handbook's thermal survey: attach a patch of the same material and thickness, several thermocouples, the blanket and a bag to the repair area. Heat it, let it settle, and record. Add insulation where a thermocouple differs by more than 10 degrees from the average, more over cool spots and less over hot ones. With access behind the repair, extra blankets there even the heat.
Do it for every heating method, before the real repair goes on.
Ramp, soak and cool-down
A room-temperature wet layup is the easiest cure but does not restore the strength or durability of a 250 or 350 °F original; heat speeds it, and the Handbook puts the best properties at 150 °F (p. 7-32). All prepregs cure at elevated temperature, typically 250 or 350 °F (p. 7-33).
An elevated cure has at least three segments: ramp up, typically 3 to 5 °F per minute; hold for the set time; cool down, typically under 5 °F per minute (p. 7-33). The Handbook's examples are 1 to 5 °F per minute up, 90 to 150 minutes at 260 ± 6 °F for the 250 °F class, and 120 to 180 minutes at 355 ± 10 °F for the 350 °F class (pp. 7-32, 7-37). The hold starts when the last thermocouple is in range.
Keep at least 22 inHg of vacuum through the whole oven or blanket cure; release the bag and remove the layup below 125 °F (pp. 7-32, 7-37). At altitude the gauge reads differently: check it with the vacuum at altitude calculator. The cure cycle planner turns ramp, hold and cool into times.
The cure record
The Handbook says all time and temperature requirements must be met and documented, and the history starts with material storage (p. 7-32). A hot bonder prints or uploads the cure data (p. 7-23).
A useful record, as shop practice rather than a Handbook list: material lot and out-time, where each thermocouple was, ramp, hold and cool times with temperatures, the vacuum reading and a test specimen cured with the repair (AC p. 3-1).
Questions people actually ask
Can I cure a wet layup at room temperature?
Yes for non-critical parts. The Handbook says it does not restore the strength or durability of a 250 or 350 °F original, and that heat up to 150 °F speeds it.
Why three thermocouples?
One reads the repair, the others show whether it is even. The Handbook says never to use fewer than three to monitor a heating cycle.
Why not control from the oven or blanket temperature?
A heat sink makes the part colder than the air or the element. The part temperature is what counts, so the thermocouples go on the part.
How do I know the vacuum is enough?
Hold at least 22 inHg through the cure. If it falls with the pump valve closed there is a leak: fix it before the resin gels.
Limits of this guide
What the sources support, and no further.
- The schedule is not here. Ramp, hold, tolerance and pressure come from the SRM or the material maker's sheet. The numbers shown are the Handbook's examples.
- Not covered. Autoclave cycles for pressure, thermoplastics and cure of adhesive on metal bonds.
- The record list is usual practice, not printed as a list in the Handbook.
Where to buy
Distributors coming soon.
Sources
- FAA-H-8083-31B, AMT Handbook — Airframe, Volume 1 (2023), Chapter 7 — pp. 7-22 to 7-24, heat sources, thermocouples; p. 7-25, placement, thermal survey; pp. 7-32 and 7-33, room temperature and elevated cures, ramp, hold and cool-down, figure 7-53; p. 7-37, figure 7-62.
- AC 43.13-1B, Change 1, Chapter 3, Fiberglass and Plastics — p. 3-1, test specimens; p. 3-6, bagging materials and temperature; p. 3-7, heat blanket, pressure plate.