Tapping a panel, mapping the edge
Where to buy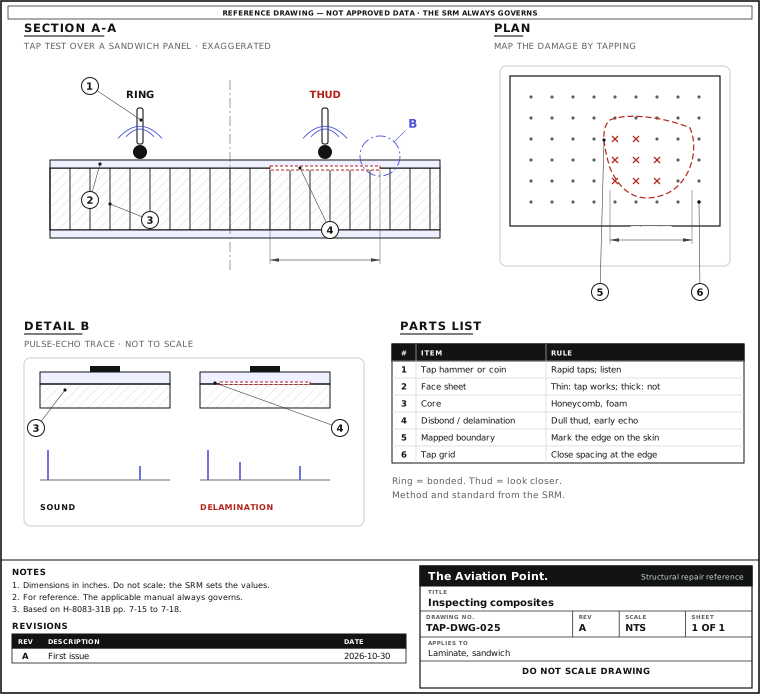
Map the damage, one step at a time
| Step | Action | What to do |
|---|---|---|
| 1 | Look first | Do the visual check and photograph the damage. |
| 2 | Tap or scan outward | Work out from the damage until the sound is clean on all sides. |
| 3 | Mark the edge | Mark it on the skin with a pen that is approved for the surface. |
| 4 | Record it | Write down the size, the depth if known and the method used. |
| 5 | Check the back | Repeat on the back of a sandwich panel. |
| 6 | Look beyond the damage | Check for oil, fuel, water or dirt that has got into the part. Water in a core has to come out before the repair. |
Which method finds what
| Method | Finds | Misses or limits |
|---|---|---|
| Visual | Scorch, stains, dents, penetration, abrasion, chips, wrinkles, blisters, resin starvation, discolouration from heat or lightning. Primary in-service method; whitening shows delamination in semitransparent glass laminates | Internal delaminations, disbonds and matrix crazing; damage under paint or deep below the surface; nearly all damage in opaque carbon and aramid |
| Tap test (coin or light hammer) | Delamination and disbond: a clear ring is bonded, a dull thud is not. Good on thin skins, thin skin-to-stiffener bondlines and thin honeycomb facings | Not reliable on structures of more than four plies; poorer the deeper the flaw; does not find resin cracks or broken fibres. Needs a quiet place and a tapper who knows the part |
| Automated tap | As tap, with a solenoid and a force trace; any change from the sound region shows damage | Needs a calibration on a good area |
| Ultrasonic: pulse echo | Delaminations, cracks, porosity, water and disbonds in bonded components, from one side | Does not find disbonds between skin and honeycomb core |
| Ultrasonic: high-frequency bond tester | Delaminations and voids; flaws down to 0.5 in | Skin-to-core disbond and porosity |
| Ultrasonic: low-frequency bond tester | Delaminations, voids and skin-to-core disbonds | Cannot tell which side; nothing under 1.0 in |
| Thermography | Debonds, cracks, impact damage, panel thinning and water ingress, from differences in heat flow | Best on thin laminates and near-surface defects |
| Radiography (X-ray) | Crushed or blown core, water in cells, voids in foam adhesive, position of internal parts | Delaminations lying flat to the beam; impractical around aircraft for radiation safety |
| Moisture meter | Water in honeycomb, by the radio-frequency power it absorbs | Says nothing of delamination or disbond |
FAA-H-8083-31B Vol. 1 pp. 7-15 to 7-18, 7-38 to 7-39. Ultrasonic work needs reference standards and trained operators; the Handbook warns it is harder in a repair environment than on a production line. The SRM names the method each repair needs.
Which method fits?
You need to survey deep damage in a thick laminate. Which method fits?
- Visual
Not this one. The eye cannot find internal delaminations.
- Tap test
Not this one. The Handbook rates tapping unreliable on thicker laminates.
- Ultrasonics
Best fit. The Handbook calls it arguably the most accurate and practical way to survey damage, and it finds small delaminations deep below the surface.
The SRM names the inspection method and the limits.
Tap testing, properly
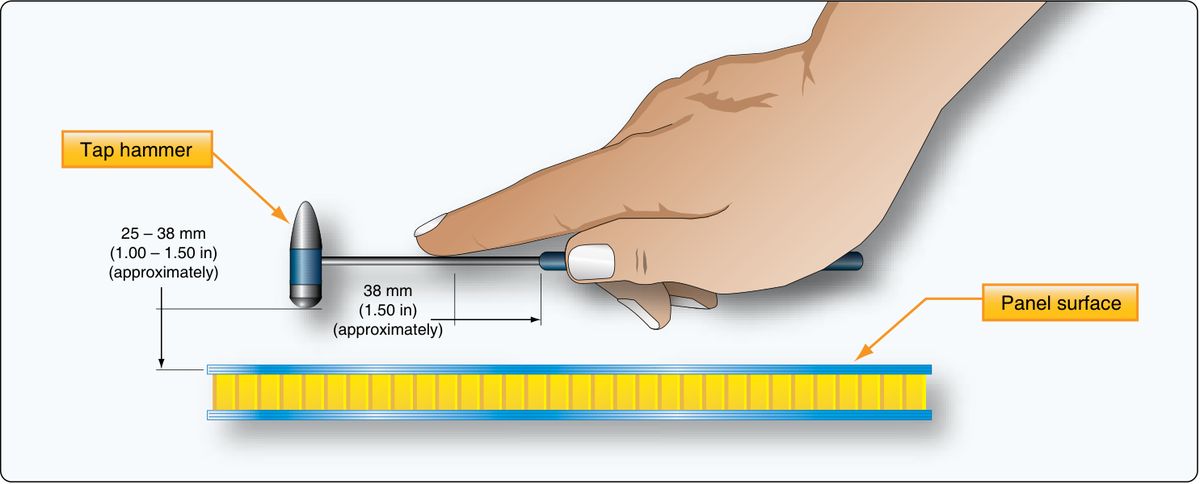
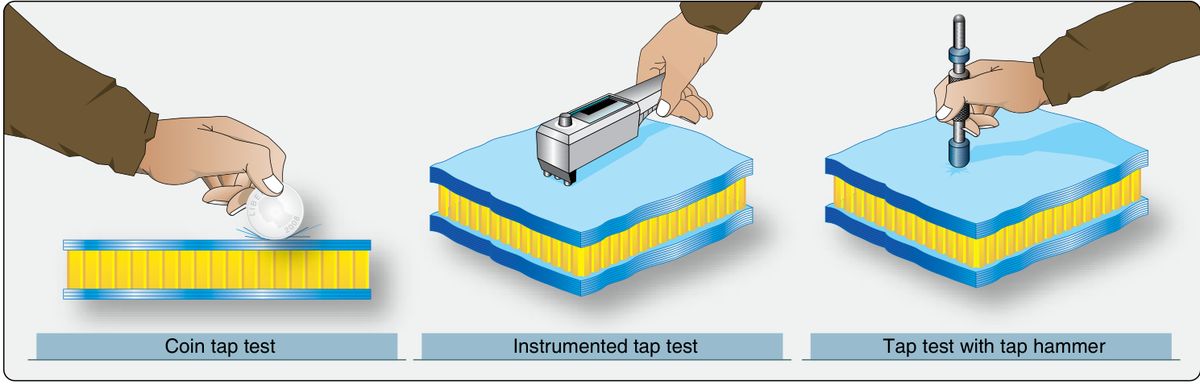
Tap with a coin or a light hammer, quickly enough to hear the pitch, in a quiet place. The Handbook calls it perhaps the most common method for delamination and disbond and surprisingly accurate in experienced hands (p. 7-15).
Know the part first. Internal elements, such as core edges, stiffeners and potting, change the pitch by design and can be read as defects (p. 7-15). Tap a known good area of the same part to set the ear.
Use it to map the damage on thin honeycomb facings (p. 7-15). On thicker laminates it is used to look near the surface only, and the Handbook rates it unreliable beyond four plies (p. 7-15). For deeper damage, ultrasonics is “arguably the most accurate and practical” for surveying damage, and finds small delaminations deep below the surface (p. 7-38).
Mapping the damage
A bonded repair starts with an accurate survey of the size and depth of the damage by NDI (p. 7-38). The repair cut-out and its taper are laid out from that map, not from the dent.
Practical order (shop practice): visual first and photograph; tap or scan outward from the damage until the sound is clean on all sides; mark the edge on the skin with a pen that is approved for the surface; record size, depth if known and the method used; repeat on the back of a sandwich panel.
Look beyond the damage for oil, fuel, water or dirt that has got into the part (p. 7-34). Water in a sandwich core needs a moisture meter, X-ray or back light, and has to come out before the repair (pp. 7-34, 7-35).
After the repair the Handbook shows a post-repair inspection (figure 7-63, p. 7-37): the same method on the finished patch and its surround.
For UAV, model and homebuilt work
A coin and a bright light on a thin skin find most of what matters: tap the whole area around any impact, and check a foam or honeycomb core for water before you fill or bond. Thick or primary structure on a certified aircraft needs the method the SRM names and a qualified operator.
Questions people actually ask
How accurate is a tap test?
The Handbook calls it surprisingly accurate in experienced hands, but not reliable on structures with more than four plies, and it does not find resin cracks or broken fibres (pp. 7-15, 7-38).
Which method finds a skin-to-core disbond?
The low-frequency bond tester does; pulse echo and the high-frequency bond tester do not (Handbook pp. 7-16, 7-17). Tapping also finds it on thin facings.
Why not X-ray every damage?
Most composites are nearly transparent to X-rays so low energy is used, it misses delaminations flat to the beam, and the Handbook calls it impractical around aircraft for safety reasons (p. 7-18).
How do I find water in a honeycomb panel?
A moisture meter, X-ray or back light (Handbook p. 7-34). The meter measures the radio-frequency power water absorbs (p. 7-18).
Limits of this guide
What the sources support, and no further.
- The manual governs. Inspection method, reference standards and acceptance limits come from the SRM or the NDT procedures; this page explains what each finds.
- Operators. Ultrasonic and X-ray work needs trained, qualified staff; this guide does not train anyone.
- Not covered. Neutron radiography, shearography and thickness gauging, and how to calibrate any instrument.
Where to buy
Distributors coming soon.
Sources
- FAA-H-8083-31B, AMT Handbook — Airframe, Volume 1 (2023), Chapter 7 — pp. 7-15 to 7-18, visual inspection, coin tapping, automated tap, ultrasonic (through transmission, pulse echo, bond testers, phased array), radiography, thermography, moisture detector; pp. 7-34 to 7-35, inspect and dry the sandwich; pp. 7-38 to 7-39, survey of the damage for a scarf repair.
- AC 43.13-1B, Change 1, Chapter 3, Fiberglass and Plastics — para. 3-2a, check for voids and delamination by tap testing.