Scarf and step, side by side
Where to buy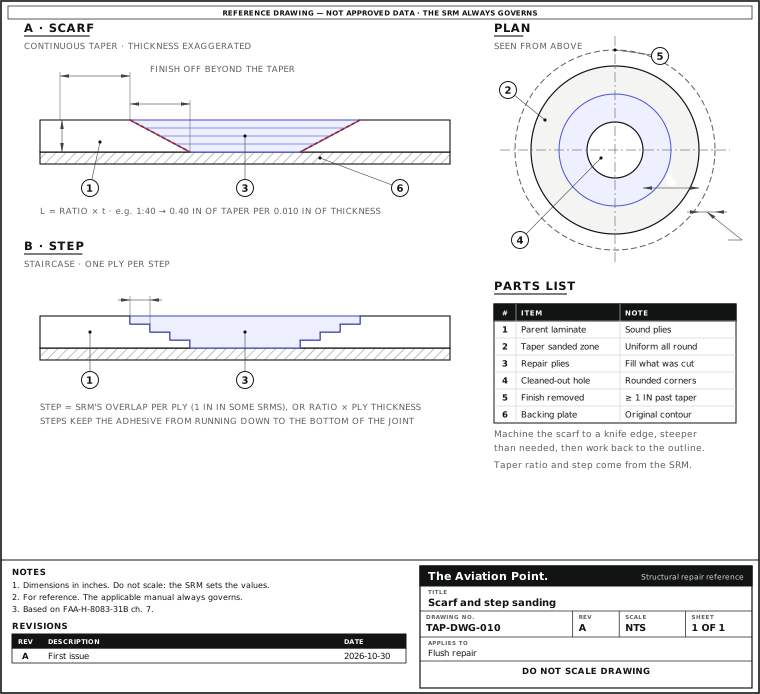
Prepare a scarf, one step at a time
| Step | Action | What to do |
|---|---|---|
| 1 | Trim the damage | Cut it out to a smooth round or oval shape with rounded corners. Do not cut into the plies that are staying. |
| 2 | Sand the taper | Use a flexible disc or rotating pad sander to get a uniform slope all round. Wear dust protection. |
| 3 | Count the plies | Check the number, orientation and material against the skin identification in the SRM, not against how the edge looks. |
| 4 | Remove the finish | Take it off past the border of the taper, including any conductive coating. |
| 5 | Clean | Remove the dust with dry compressed air and a vacuum cleaner, then wipe with a clean cloth and an approved solvent. |
| 6 | Dry | Water in the core boils during a hot cure and blows the face sheets off. Moisture on the surface also inhibits the cure of the resin. |
| 7 | Abrade and clean again | Abrade lightly close to the scarf zone, then clean it once more. |
Scarf or step
| Scarf | Step | |
|---|---|---|
| Shape | One smooth slope | A staircase, one step per ply |
| For | Flush repairs; the most efficient load transfer: it aligns the neutral axis of parent and patch | Where the adhesive would run to the bottom of a scarf; external patches are usually stepped |
| Cost | A large amount of sound material comes out to keep the taper shallow; the plies must be placed very accurately | Approximates the scarf with small steps, so the adhesive cannot run to the bottom |
| Watch | Cured outside an autoclave, the replacement plies can lose a lot of strength | External patches are usually stepped to cut the stress concentration at the patch edge |
| Ratio | 1:10 to 1:70 thickness to length; “such as 1:40” | About one step per ply; “a 1-inch overlap for each ply” in some manuals |
FAA-H-8083-31B pp. 7-35 (taper ratio, 1-inch overlap), 7-38 (scarf against step, 1:10 to 1:70) and 7-41 (external patches usually stepped). AC 43.13-1B p. 3-5 uses a 1 in step for fiberglass facings.
Taper numbers in the public documents
| Source | Number | For |
|---|---|---|
| H-8083-31B p. 7-35 | 1:40, or 1 in per ply | Honeycomb face sheet, as an example of what “some manufacturers give” |
| H-8083-31B p. 7-38 | 1:10 to 1:70 | Solid laminates, thickness to length |
| AC 43.13-1B p. 3-3 | About 50 × the face ply thickness | Fiberglass holes under 3 in, non-structural |
| AC 43.13-1B p. 3-5 | 1 in per layer | Fiberglass step joint |
None of these is a design value. The ratio for your part is in its SRM; the Handbook says some manufacturers give a ratio and others a distance.
Quick check
A patch goes on the outside of the skin. Which shape is usual?
- A short, steep taper
Not this one. A taper sanded too steep can fail at the bond line.
- Stepped
Best fit. External patches are usually stepped, to cut the stress concentration at the patch edge.
- One long scarf
Not this one. A scarf is the flush repair. It takes a lot of sound material out of the part.
On a real job, the SRM decides.
Sanding the taper
Trim the damage out to a smooth round or oval shape with rounded corners (Handbook p. 7-35; AC p. 3-1: avoid abrupt changes of section). Do not cut into the plies that are staying.
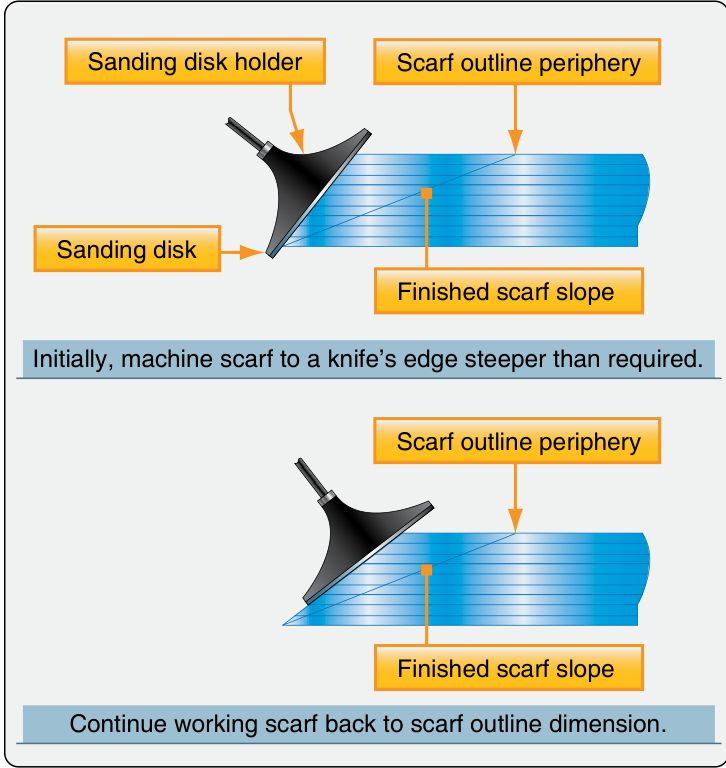
Taper sand with a flexible disc or rotating pad sander to a uniform slope all round (p. 7-35). The Handbook's figure for solid laminates says to machine the scarf to a knife edge, steeper than required, then work it back to the outline (p. 7-39). Fiberglass up to 3 in across can be taken out by power or hand sanding with 180-grit paper (AC p. 3-3).
Count the plies against the record. Number, orientation and material come from the skin identification in the SRM, not from what the sanded edge looks like (p. 7-36). Stop when the repair drawing says, and map the edge.
Wear dust protection: sanding fiberglass gives off dust that irritates skin and lungs, and it makes static that attracts dirt (AC p. 3-1).
Cleaning before the bond
Remove the finish, including any conductive coating, for at least 1 in beyond the border of the taper (Handbook p. 7-35).
Remove sanding dust with dry compressed air and a vacuum cleaner, then wipe with a clean cloth moistened with an approved solvent (p. 7-35). For a scarf zone that has been open for a long time, clean with solvent again before the bond (p. 7-39).
Dry it. Water in the core boils during an elevated-temperature cure and blows the face sheets off (p. 7-35); in the AC's words, any moisture left on the surface inhibits the cure of the resin (p. 3-2).
Abrade lightly with sandpaper close to the scarf zone and clean again (p. 7-39).
Worked example
A laminate of 8 plies at 0.0075 in cured each, taper 1:40. A made-up case; the ratio comes from your SRM.
- Thickness = 8 × 0.0075 = 0.060 in.
- Taper each side = 40 × 0.060 = 2.400 in.
- Across a 2 in hole the sanded zone is 2 + 2 × 2.400 = 6.800 in.
- Remove the finish to 6.800 + 2 × 1 = 8.800 in across.
A 2 in hole needs a 6.8 in taper and a finish removed to 8.8 in.
Questions people actually ask
Why not sand a short, steep taper?
A steep taper puts the load into the bond line in shear at the edge and wastes adhesive. The Handbook says scarf angles are small “to ease the load into the joint and to prevent the adhesive from escaping”.
Scarf or step for a thin face sheet?
The Handbook says honeycomb parts with thin face sheets are most effectively repaired by a bonded scarf, with a bonded external step patch as the alternative.
Can I repair a thick laminate with a scarf?
Not always. The Handbook notes that laminates up to an inch thick in highly loaded areas cannot be repaired effectively with a bonded scarf; bolted repairs are used instead.
Where does the ratio come from?
The SRM, or the engineering behind the repair. This page does not suggest one.
Limits of this guide
What the sources support, and no further.
- The ratio and the step are the manual's. The numbers here are what the public documents print, not what to use.
- Scope. The AC fiberglass numbers apply to non-structural fiberglass; the Handbook steps are not a substitute for the SRM.
- Not covered. Bolted repairs and patches bonded to metal; sandwich core replacement.
Where to buy
Distributors coming soon.
Sources
- FAA-H-8083-31B, AMT Handbook — Airframe, Volume 1 (2023), Chapter 7 — p. 7-35, taper sanding, ratio 1:40 or 1-inch overlap, finish removed 1 inch beyond, cleaning; p. 7-36, plies from the skin identification; p. 7-38, scarf against step, 1:10 to 1:70; p. 7-39, knife edge, surface preparation; p. 7-41, external patches usually stepped.
- AC 43.13-1B, Change 1, Chapter 3, Fiberglass and Plastics — p. 3-1, round corners, sanding dust; p. 3-2, moisture; p. 3-3, 180-grit, scarf about 50 times the face ply; p. 3-5, step joint 1 in per layer.