Finish removed and restored over a scarf repair
Where to buy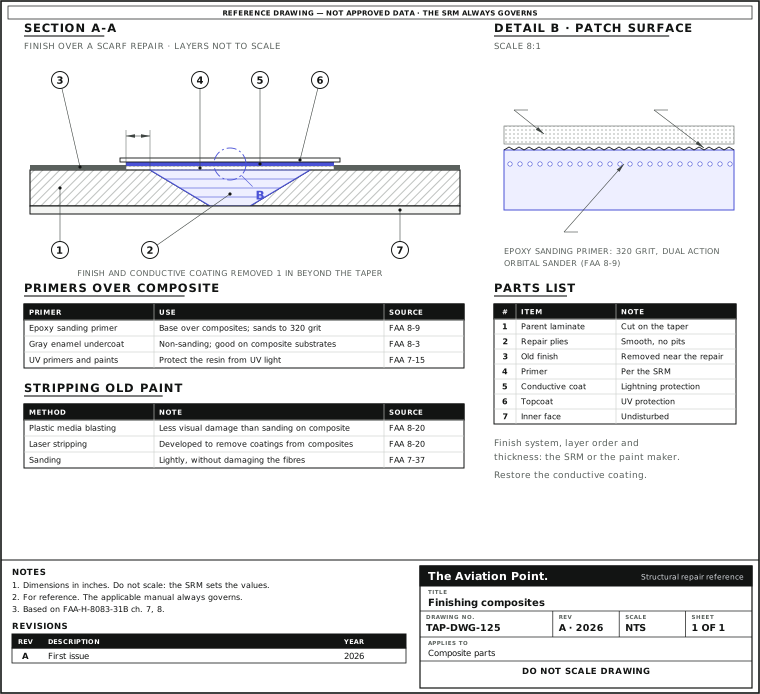
Why the finish matters on composite
Ultraviolet light. UV light affects the strength of composite materials, so composite structures are protected by a top coating; special UV primers and paints have been developed for them (H-31B p. 7-15).
Erosion. Composites erode more easily than aluminium, so leading edges generally carry an erosion coating, and the edges of doors and panels exposed to the air stream can erode too (p. 7-14).
Lightning. A repair removes the exterior finish including the conductive coating over an area at least 1 inch larger than the border of the taper; the last step of the repair applies the top finish and the conductive coating again (pp. 7-35, 7-37).
Preparing the surface
1. Remove the finish far enough. At least 1 inch (about 25 mm, not the official figure) beyond the border of the taper, conductive coating included (p. 7-35).
2. Strip with care. Plastic media blasting has been used on composite surfaces because it leaves less visual damage than sanding the paint off; laser stripping has been developed to remove coatings from composites (p. 8-20). Check the method against the SRM before use.
3. Sand the patch lightly. After the cure, lightly sand the repair patch to a smooth finish without damaging the fibres; the patch should be free of pits, blisters, resin-rich and resin-starved areas (p. 7-37).
4. Seal before paint. Composite cowlings and plastic fairings must be properly sanded and sealed before painting, or sanding scratches show through the finish (p. 8-14).
5. Clean. Improper cleaning and preparation is the first cause of poor adhesion (p. 8-12). Use the cleaner the SRM names; acetone is a strong solvent for most plastics (p. 8-1).
Primers over composite
| Primer | Use | Source |
|---|---|---|
| Epoxy sanding primer | Excellent base over composites; finish sanded with 320 grit on a dual action orbital sander; compatible with two-part epoxy primers and polyurethane topcoats | H 8-9 |
| Gray enamel undercoat | Single-component, non-sanding; a good primer for composite substrates | H 8-3 |
| UV primers and paints | Protect composite structure from UV light | H 7-15 |
Priming and painting
Composite surfaces that need priming range from the whole aircraft to fairings, radomes, antennas and control surface tips (p. 8-9). Prime, restore the conductive coating and apply the topcoat in the order and to the thickness the SRM or the paint maker gives. Zinc chromate is not used under polyurethane paints (p. 8-9).
Wear a charcoal-filtered, double-cartridge organic vapour respirator for spraying and sanding (p. 8-8).
What to check when the finish is done
| Check | How | Source |
|---|---|---|
| Patch surface smooth, fibres intact | Visual, before primer | H 7-37 |
| Conductive coating restored over the whole stripped area | Visual against the SRM; electrical check if the SRM asks | H 7-35, 7-37 |
| No sanding scratches, fisheyes or blushing | Visual, in good light | H 8-12 to 8-14 |
| Repair inspected after finishing | Visual, tap and/or ultrasonic | H 7-37 |
Defects and fixes
| Defect | Cause | Fix | Source |
|---|---|---|---|
| Sanding scratches show through | Composite not sanded and sealed before the finish | Sand and seal before the finish coats | H 8-14 |
| Poor adhesion | Poor cleaning, wrong primer, topcoat not compatible with the primer | Remove the finish completely, correct the cause, refinish | H 8-12 |
| Fibres cut on the patch | Sanding too hard after the cure | Sand lightly; disposition of cut fibres by the SRM | H 7-37 |
| Lightning protection lost | Conductive coating not restored | Apply the conductive coating as the SRM says | H 7-37 |
| Edges eroding | Edges exposed to the air stream without protection | Erosion coating as the SRM says | H 7-14 |
Questions people actually ask
How far beyond the repair does the paint come off?
At least 1 inch beyond the border of the taper, conductive coating included, per the Handbook. The SRM may ask for more.
Can composite be sanded to bare fibre before painting?
No. The Handbook says to lightly sand the patch to a smooth finish without damaging the fibres.
Which primer goes on composite?
Epoxy sanding primers are described as an excellent base over composites, and gray enamel undercoat as a good primer for composite substrates. The SRM or the paint maker names the system.
Why put the conductive coating back on a small repair?
It is part of the lightning protection; the Handbook's repair steps end with the top finish and the conductive coating.
Limits of this guide
What the sources support, and no further.
- The manual governs. Finish system, layer order, film thickness and conductive coating come from the SRM or the paint maker.
- Stripping. Chemical strippers are not covered here; use only what the SRM allows on composite.
- Radomes. Radome finishes have their own limits in the SRM.
Where to buy
Distributors coming soon.
Keep going
Calculators
Guides
Data sheets
Books
Buy
Distributors coming soon.
Sources
- FAA-H-8083-31B, Aviation Maintenance Technician Handbook: Airframe, Chapters 7 and 8 — p. 7-14, erosion and erosion coatings; p. 7-15, UV light and top coatings; p. 7-35, finish and conductive coating removed 1 inch beyond the taper; p. 7-37, light sanding, top finish and conductive coating, post-repair inspection; p. 8-1, acetone; p. 8-3, gray enamel undercoat; p. 8-8, respirators; p. 8-9, primers over composite surfaces; pp. 8-12 to 8-14, finish defects; p. 8-20, plastic media blasting and laser stripping.