The fastener and the sizes
Where to buy| Item | Detail | Source |
|---|---|---|
| Parts of a cleco | Steel cylinder body, plunger on top, spring, a pair of step-cut locks, and a spreader bar | H-31 p. 4-29 |
| Sizes | 3/32, 1/8, 5/32, 3/16, 1/4 and 3/8 in diameter, size stamped on the fastener | H-31 p. 4-29 |
| Colour | Colour coding for easy size recognition; see the cleco colour chart | H-31 p. 4-29 |
| Pliers | One special type of plier fits all six sizes | H-31 p. 4-29 |
| Hex nut and wing nut types | Higher clamp-up pressure: hex nut up to 300 lb with a hex nut runner; wing nut 0 to 300 lb, tightened by hand. A cleco hex nut also fits pneumatic cleco installers | H-31 p. 4-29 |
H-31 = FAA-H-8083-31B, Airframe Handbook, Chapter 4.
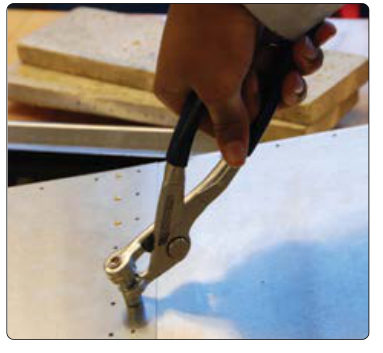
Install and remove a cleco
| Step | Action | What to do |
|---|---|---|
| 1 | Choose the size | Read the stamp or colour and use the cleco that matches the hole, then use the pliers. |
| 2 | Open the cleco | Squeeze the pliers on the cleco so the plunger is pushed and the locks retract. |
| 3 | Insert through both sheets | Push the cleco through the aligned holes until the locks are past the back sheet. |
| 4 | Release | Let the plunger spring back so the locks pull the sheets tight together. |
| 5 | Check | The sheets must be tight with no gap. If sheets can separate, drill chips or burrs will get between them. |
| 6 | Remove | Squeeze the pliers again, retract the locks, and pull the cleco out. Clean off chips before you go on. |
Typical mistakes
| Mistake | What happens | Fix |
|---|---|---|
| Wrong size for the hole | A loose cleco lets the sheets move; one too large enlarges the hole | Match the stamp or colour to the hole |
| Not enough clecos | Sheets separate while drilling or riveting | The handbooks give no spacing; follow the SRM or work card |
| Chips left between sheets | Gap, poor fit | Remove clecos, clean, refit |
| Using a cleco as a rivet backup | Not its job | Temporary fastener only |
The Handbook says sheets "separate while being riveted or drilled" if not held tightly together (p. 4-28).
Care
Check the pliers for wear in the jaws, and the clecos for a weak spring or bent locks. A cleco that does not clamp should be replaced. Maker's maintenance data for pneumatic installers is not covered by the Handbook.
Questions people actually ask
What do the cleco colours mean?
Each of the six sizes has its own colour so you can tell them apart at a glance. See the cleco size and colour chart for the full list.
How many clecos per sheet?
The FAA handbooks give no spacing. Follow the repair manual or the work card; the aim is that the sheets cannot separate.
What is a wing nut cleco for?
Higher clamp-up pressure than a standard cleco, up to 300 lb, tightened by hand (p. 4-29).
Limits of this guide
What the sources support, and no further.
- Not approved data. The SRM or work card says how many temporary fasteners to use.
- Cleco colours. The Handbook only says colours exist; read them from the chart.
Where to buy
Distributors coming soon.
Sources
- FAA-H-8083-31B, AMT Handbook: Airframe (2023), Chapter 4 — pp. 4-28 to 4-29, "Reusable Sheet Metal Fasteners", "Cleco Fasteners", "Hex Nut & Wing Nut Temporary Sheet Fasteners"; Fig. 4-72.