The drawing
Where to buy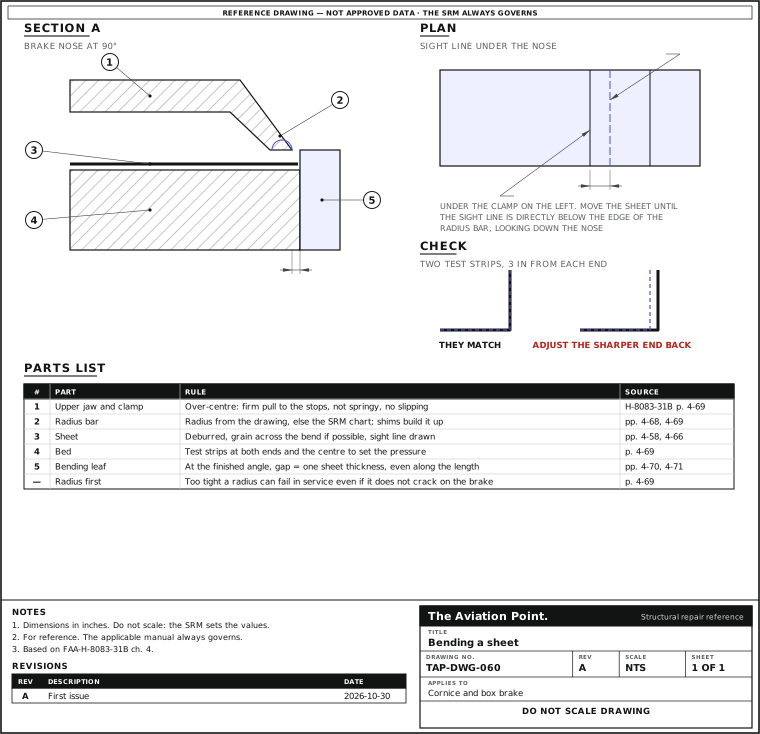
Step by step
| Step | Action | What to do |
|---|---|---|
| 1 | Get the radius | From the drawing; if it is not there, the SRM minimum bend radius chart. See the bend radius chart. |
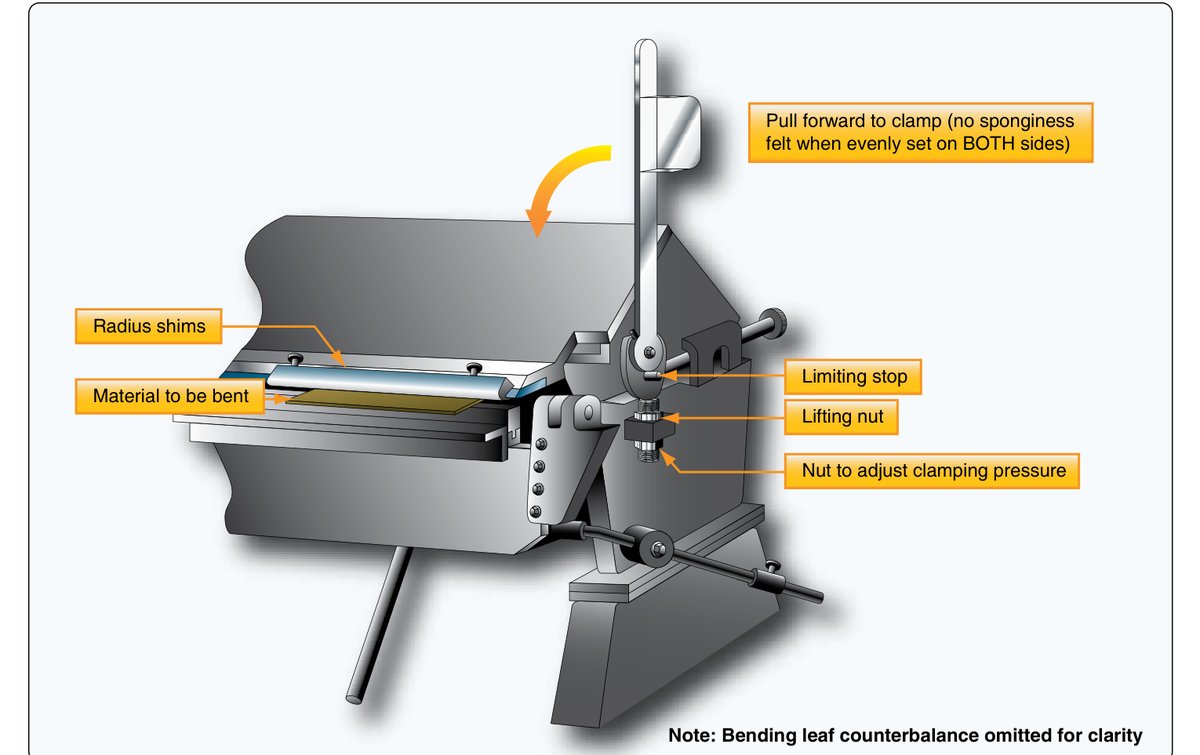
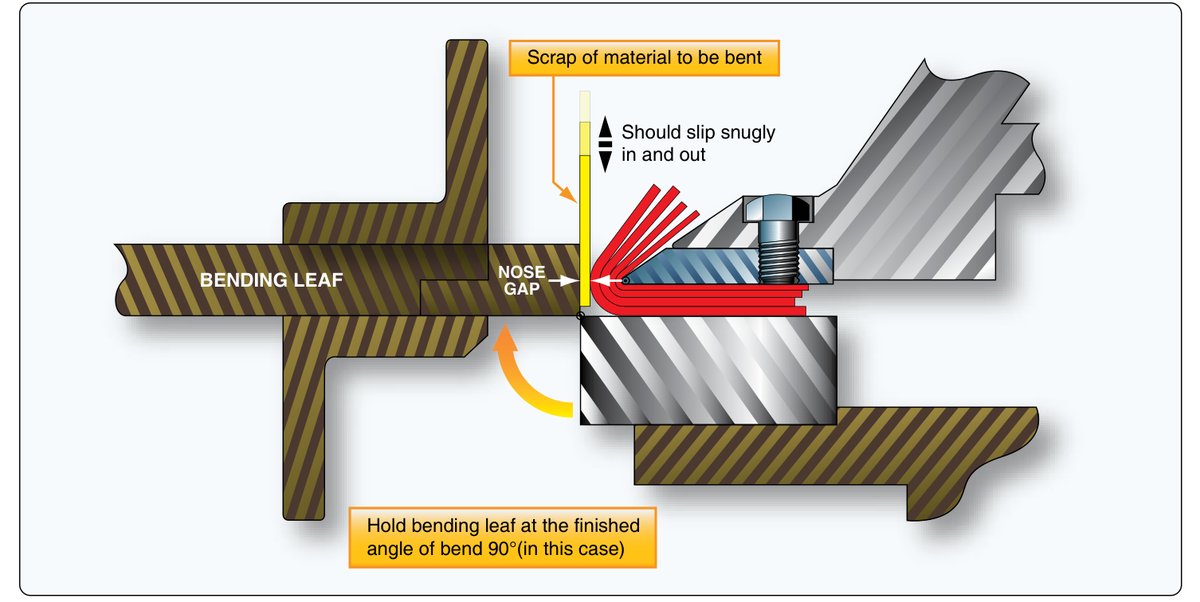
| 2 | Fit the radius bar | Swap the bar, or build up a smaller one with nose radius shims. The Handbook example: a 0.063 in shim round a 1/16 in nose gives 1/8 in. |
| 3 | Set the clamp | Sheet of the same thickness under the bar. Pull the lever: firm, not springy, reaching its stops. Test strips 3 in from each end and one in the centre: it must stop them slipping. |
| 4 | Set the nose gap | Hold the leaf at the finished angle. Gap = one sheet thickness, checked with a scrap as a feeler, even along the length. |
| 5 | Test two strips | Clamp a strip 3 in from each end, bend 90°, lay one on the other. They should match. If not, ease back the end with the sharper bend. |
| 6 | Prepare the sheet | Deburred, relief holes drilled, grain across the bend if you can, sight line drawn one radius inside the bend tangent line that goes under the bar. |
| 7 | Position | Slide the sheet under the clamp. Looking straight down the nose, move it until the sight line is directly below the edge of the radius bar. Clamp. |
| 8 | Bend | Raise the leaf. The bend starts exactly on the bend tangent line. Check the angle and the flats against the drawing. |
Tools you need
| Tool | What for | Buying guide | Catalog |
|---|---|---|---|
| Cornice or box brake | Straight bends | Bending brakes | — |
| Radius and fillet gauges | Check the bar and shims | Bending brakes | — |
| Deburring tool | Edges before bending | Deburring tools | Edge tool |
The three settings
| Setting | Right when | Adjust with |
|---|---|---|
| Radius bar | Equals the required radius | Interchangeable bars or shims |
| Clamp pressure | Firm pull to the stops, no sponginess, no slipping | Clamping pressure nut, both sides |
| Nose gap | One thickness, even along the part, at the finished angle | Nose gap knobs at the rear of the upper jaw |
FAA-H-8083-31B pp. 4-68 to 4-71.
Quick check
Where does the sight line go?
- One radius inside the bend tangent line that goes under the brake
Best fit. Yes: the Handbook puts it there, one radius from that line.
- In the middle of the bend allowance
Not this one. The Handbook names this as the common mistake.
- On the bend tangent line
Not this one. That line must end up where the bend starts, not under the edge of the bar.
On a real job, the SRM decides.
What to check when it is done
| Look at | Good | If not |
|---|---|---|
| Radius | Matches the drawing; check with a gauge | Reset the bar |
| Outside of the bend | No cracks | Reject: radius too small or edge rough |
| Angle | As drawn, even along the length | Check the nose gap |
| Flats | To the drawing | Recheck setback and sight line |
| Corners | Relief holes in place | Remake the part |
Questions people actually ask
Why did it crack when the radius looked fine?
Check the grain, the temper and the edge. Stress left by too tight a radius can fail a part in service even if it does not crack on the brake.
How do I get a radius my brake does not have?
Nose radius shims, bent from sheet of a known thickness. Check with radius gauges.
Limits of this guide
What the sources support, and no further.
- The manual governs. Where the SRM, the drawing or the fastener maker says otherwise, follow them; this page explains general practice.
- Flat pattern maths is not here. It is in the bending guide.
Where to buy
AmericaDistributor coming soonOur partner for this region is on its way
EuropeDistributor coming soonOur partner for this region is on its way
OceaniaDistributor coming soonOur partner for this region is on its way
Distributors coming soon.
Sources
- FAA-H-8083-31B, Aviation Maintenance Technician Handbook: Airframe, Chapter 4 — p. 4-58, grain; p. 4-66, sight line, Fig. 4-131; pp. 4-68 to 4-71, using a brake, Figs. 4-135 to 4-144.
- FAA AC 43.13-1B CHG 1, Acceptable Methods, Techniques and Practices — par. 4-55, bending metal.
Educational reference only. not approved data. Always consult the applicable SRM, AMM, or AC 43.13-1B and your certifying authority.