Image coming soonMatched pair of dimple dies, male and female
The two dies
Where to buy| Die | Shape | Job |
|---|---|---|
| Male die (punch) | A guide the size of the rivet hole, beveled to match the rivet head countersink | Presses the sheet into the female die |
| Female die | Has a hole into which the male guide fits, with a matching bevel | Rests on a solid surface and shapes the dimple |
H-31 p. 4-41. A separate set is needed for each rivet size and shape of head.
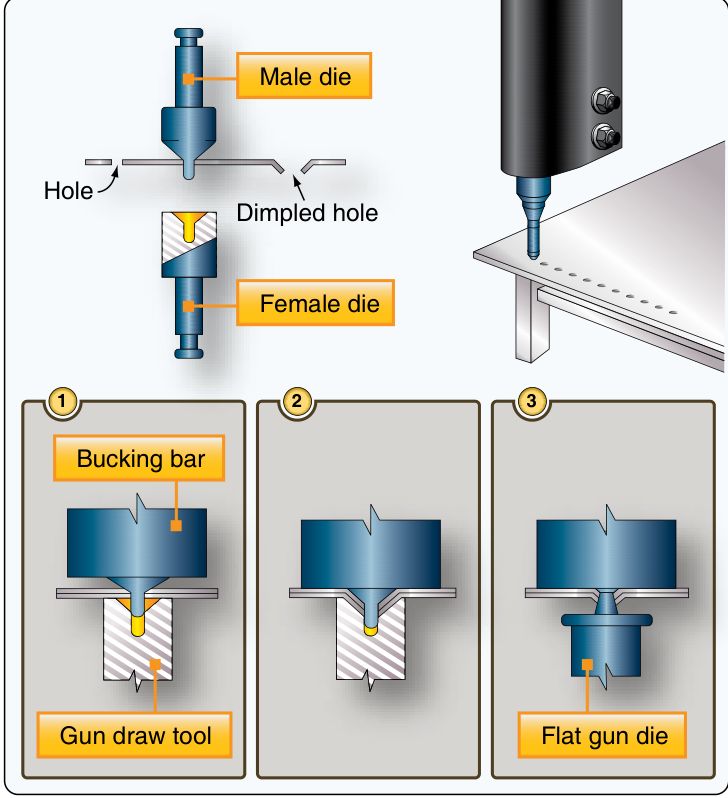
Dimple a hole
| Step | Action | What to do |
|---|---|---|
| 1 | Drill and deburr first | The hole is already at its final size. Keep hammer blows or pressure to a minimum so the area is not work-hardened (p. 4-39). |
| 2 | Set the female die | Rest it on a solid surface. |
| 3 | Place the sheet | Put the sheet over the female die, hole over the die hole. |
| 4 | Insert the male die | Set it in the hole. |
| 5 | Strike or squeeze | With a hammer, two or three solid blows should be enough. With a squeezer, adjust the dies accurately to the sheet thickness first (p. 4-41). |
| 6 | Check the rivet | The flush head should sit level with the surface. Try with a rivet before committing the part. |
Which dimpling method
Dies and hammer
- Method
- Male and female die, hammer blows
- Good for
- Light work, small jobs; two or three solid blows
- Watch for
- A different set for each rivet size and head shape
Squeezer or table riveter
- Method
- Dies in a hand or pneumatic squeezer, or a table riveter
- Good for
- Thin skin material; repeatable
- Watch for
- Gap must be adjusted accurately to the sheet thickness
Coin dimpling
- Method
- A countersunk rivet as the male die; female die backed by a bucking bar; struck with a rivet gun
- Good for
- Only when the regular male die is broken or unavailable
- Watch for
- Hole enlarges as metal stretches, so the rivet must be swelled; drive the same rivet you used as the die
Hot dimpling
- Method
- Heated dies
- Good for
- Heavier parts that would crack when cold-dimpled
- Watch for
- Specialized equipment; temper, rivet size and equipment decide
H-31 pp. 4-41 to 4-42.
Why dimple
Dimpling removes no metal and, because the sheets nest, gives a stronger joint than the non-flush type. A dimpled joint reduces the shear load on the rivet and puts more load on the riveted sheets (p. 4-42).
Dimpling is required for sheets thinner than the minimum thickness for countersinking, and is also used for flush bolts and other flush fasteners (p. 4-42).
Typical mistakes
| Mistake | What happens | Fix |
|---|---|---|
| Too many hard blows | Work-hardened, cracked area | Two or three solid blows; no more |
| Wrong die size | Poor seat for the rivet | One set per rivet size and head shape |
| Squeezer gap not matched to sheet | Shallow or crushed dimple | Adjust accurately to the thickness |
| Coin dimple with a different rivet | Recess does not fit the head | Drive the rivet that was used as the die |
Questions people actually ask
When must I dimple instead of countersink?
When the sheet is thinner than the minimum specified thickness for countersinking (p. 4-42). The countersink or dimple calculator checks a rivet and a skin.
How many blows to form a dimple?
Two or three solid hammer blows should be enough (p. 4-41).
Limits of this guide
What the sources support, and no further.
- Not approved data. The SRM or drawing sets whether to dimple, countersink, or use a mixed stack.
- Minimum thickness. The Handbook gives no single figure; it is set by the rivet, the temper and the maker's data.
Where to buy
AmericaDistributor coming soonOur partner for this region is on its way
EuropeDistributor coming soonOur partner for this region is on its way
OceaniaDistributor coming soonOur partner for this region is on its way
Distributors coming soon.
Sources
- FAA-H-8083-31B, AMT Handbook: Airframe (2023), Chapter 4 — pp. 4-39, 4-41 to 4-42, "Dimpling", "Coin Dimpling", "Radius Dimpling", "Hot Dimpling"; Fig. 4-95.
Educational reference only. not approved data. Always consult the applicable SRM, AMM, or AC 43.13-1B and your certifying authority.