The drawing
Where to buy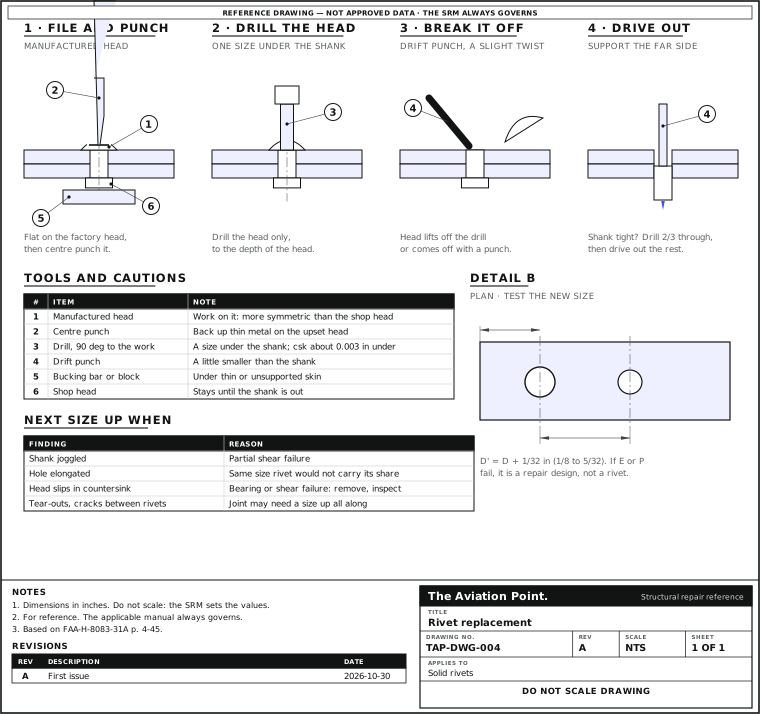
Step by step
| Step | Action | What to do |
|---|---|---|
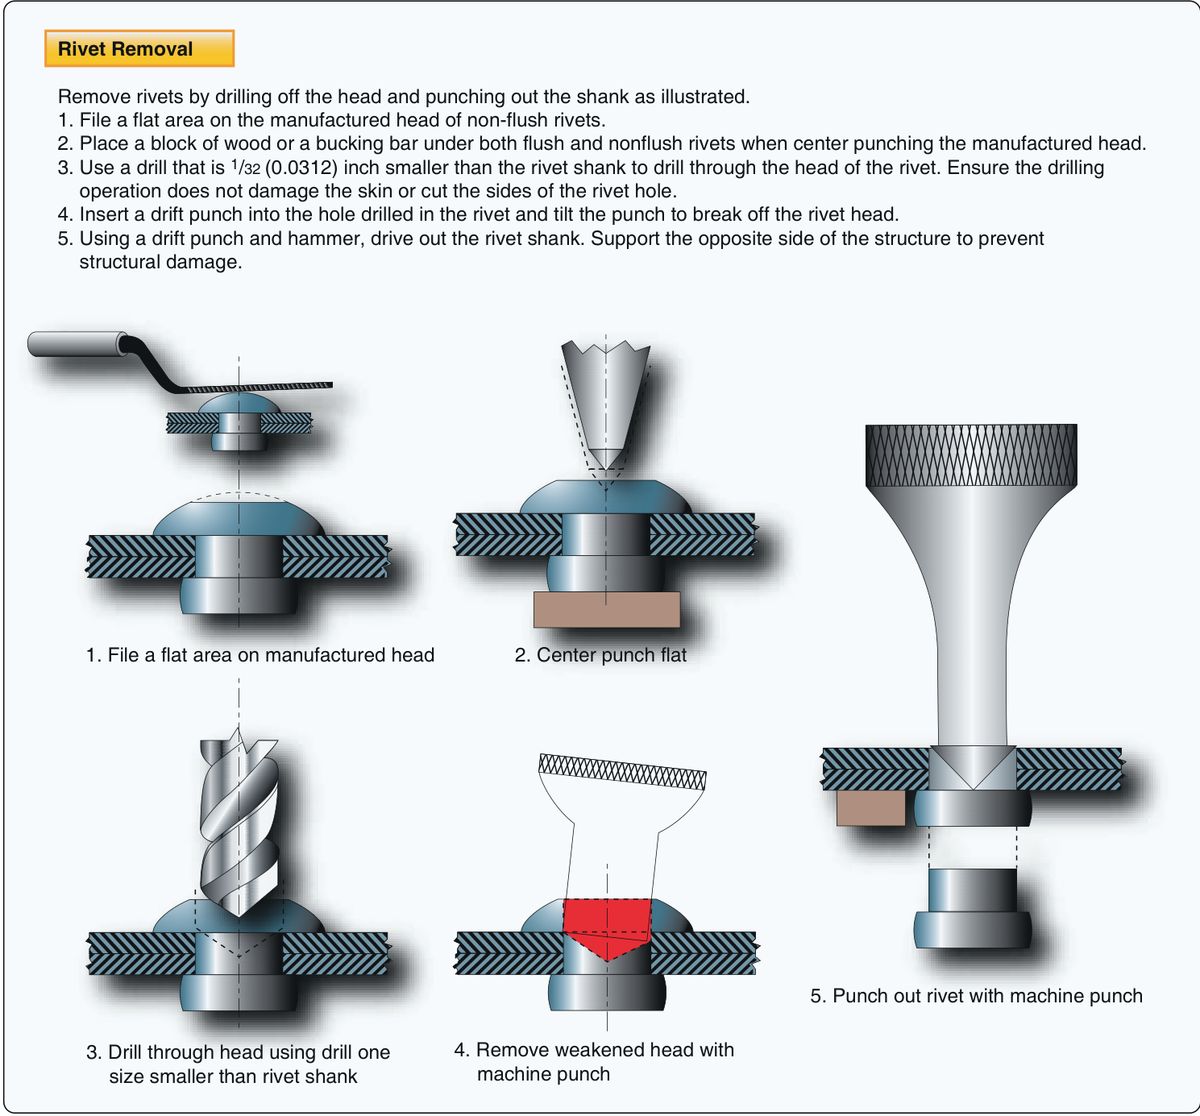
| 1 | File a flat | On a universal head, file a flat on the manufactured head. Countersunk heads need no filing. |
| 2 | Center punch | Punch the flat. On thin sheet, back up the shop head so you do not dent the metal. |
| 3 | Set the drill | Bit one size under the shank. Rest it on the punch mark and turn the chuck a few turns by hand before starting the motor. |
| 4 | Drill the head only | At 90°, to the depth of the head. On a flush rivet, about half the top sheet's thickness. The head often breaks away and climbs the bit: that is your signal to stop. |
| 5 | Break the head off | Put a drift punch in the hole and twist slightly to one side and the other. |
| 6 | Drive out the shank | Drift punch slightly smaller than the shank, with a bucking bar behind thin or unsupported sheet. If it is tight, drill about two-thirds through the thickness, then punch out the rest. |
| 7 | Check the hole | Round and same size: same rivet. Enlarged or deformed: next size up, if edge distance and pitch allow. |
Tools you need
| Tool | What for | Buying guide | Catalog |
|---|---|---|---|
| Drill and bits | Bit one size under the shank | Drill bits | #30 bit |
| Drift and center punches | Break the head, drive the shank | Rivet removal | Removal kit |
| Bucking bar | Backs up thin sheet | Bucking bars | 0.9 lb bar |
Universal or flush
Universal head
- Start
- File a flat, center punch
- Bit
- One size smaller than the shank
- Depth
- To the depth of the head
Countersunk head
- Start
- No filing; drill the exact centre
- Bit
- About 0.003 in smaller than the shank
- Depth
- About the head; roughly half the top sheet
FAA-H-8083-31B pp. 4-44, 4-45.
What to check when it is done
| Look at | Good | If not |
|---|---|---|
| Hole | Round, original size, no elongation | Next larger size, or as the manual directs |
| Shank | Straight | Joggled shank: the rivet failed in shear. Find out why; next size up |
| Sheet round the hole | No cracks, no drill tracks | Report it: this may now be a repair |
| Countersink or dimple | Not elongated | Oversize rivet only if the manual allows |
Questions people actually ask
Why the manufactured head?
It is more symmetrical about the shank than the shop head, so there is less chance of damaging the hole.
What if the rivet spins?
You have drilled past the head. Stop, or it will tear the sheet.
Limits of this guide
What the sources support, and no further.
- The manual governs. Where the SRM, the drawing or the fastener maker says otherwise, follow them; this page explains general practice.
- Which bit: the Handbook gives two wordings. "One size smaller" for universal and "about 0.003 in smaller" for flush rivets. Choose the one for your head type.
Where to buy
AmericaDistributor coming soonOur partner for this region is on its way
EuropeDistributor coming soonOur partner for this region is on its way
OceaniaDistributor coming soonOur partner for this region is on its way
Distributors coming soon.
Sources
- FAA-H-8083-31B, Aviation Maintenance Technician Handbook: Airframe, Chapter 4 — pp. 4-44, 4-45, removal; Fig. 4-98; replacing rivets p. 4-45.
- FAA AC 43.13-1B CHG 1, Acceptable Methods, Techniques and Practices — par. 4-57b, replacing rivets.
Educational reference only. not approved data. Always consult the applicable SRM, AMM, or AC 43.13-1B and your certifying authority.