Parts and settings
Where to buy| Part | What it does | Setting or check |
|---|---|---|
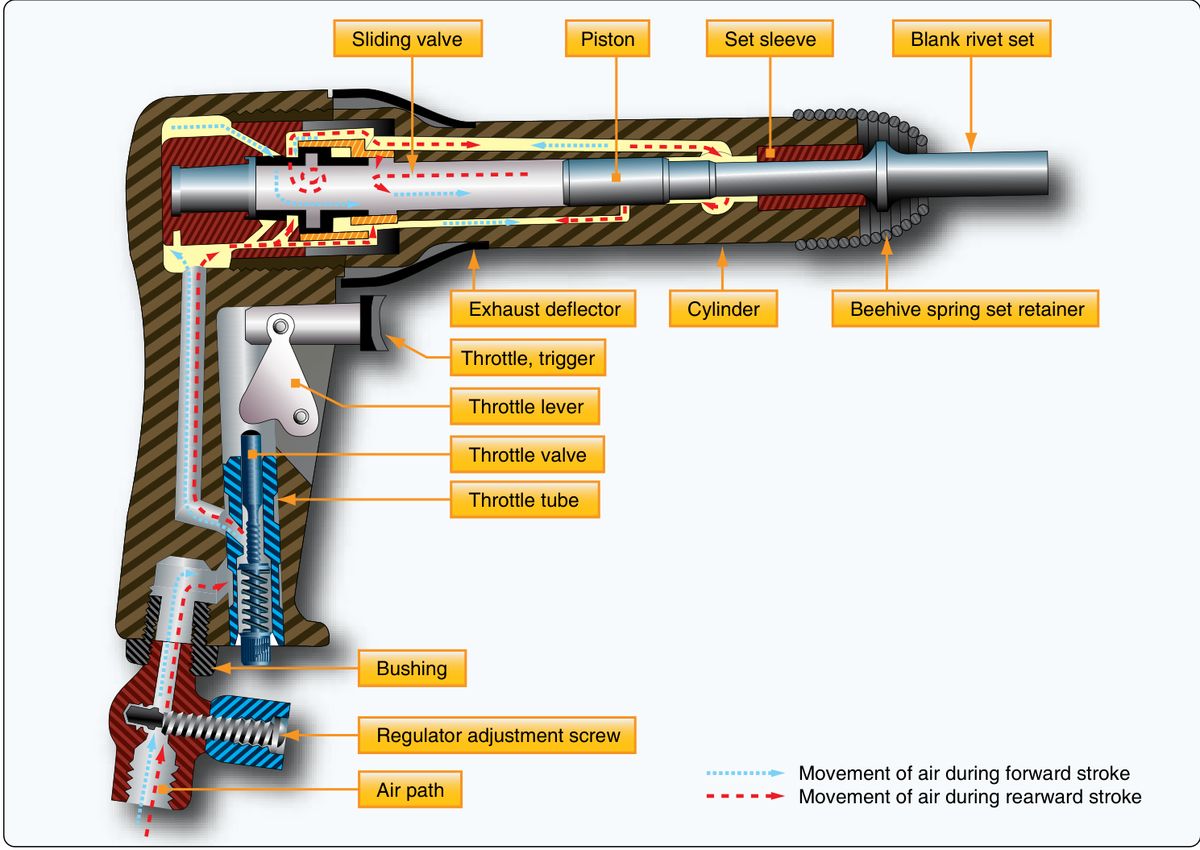
| Air supply | Drives the piston | 90 to 100 psi (H-31 p. 4-37) |
| Barrel | Holds the piston and the set | The maker's recommended capacity is usually stamped on it (p. 4-37) |
| Rivet set (header) | Carries the blow to the rivet head | Must match the rivet head; retained by a spring. Always check the set and the retaining spring are fitted (p. 4-38) |
| Needle valve (regulator screw) | Sets the driving force, on the handle | Adjust on a block of wood, never on anything harder (p. 4-38) |
| Trigger (throttle) | Starts the blows | Start slowly, one continued burst (p. 4-38) |
| Gun size | Sets the largest rivet it drives continuously | 4X for normal work (dash 8, 1/4 in rivet); 3X for smaller rivets in thinner structure; 7X for large rivets in thicker structure (p. 4-37) |
H-31 = FAA-H-8083-31B, Airframe Handbook, Chapter 4.
Drive a rivet, one step at a time
| Step | Action | What to do |
|---|---|---|
| 1 | Match gun and set to the rivet | Pick the gun for the largest rivet you drive. Fit the set that fits the rivet head: a nonflush set should contact about the centre two-thirds of the head; a flush set concentrates force when small, and spreads it over thin skin when large (p. 4-38). |
| 2 | Connect air and check the set | Hose on at 90 to 100 psi. Make sure the set and its retaining spring are in, and the set face is clean and smooth. |
| 3 | Test on wood | Press the set against a block of wood and trigger the gun. Turn the needle valve to a setting the operator finds comfortable. If no setting gives the best driving force, the Handbook's answer is a different size of gun, not more adjustment. |
| 4 | Position gun and bar | Hold the gun snugly against the rivet head and perpendicular to the surface. The bucking bar, of the proper weight, goes against the shank end. The structure must not take the force: the bar does (p. 4-38). |
| 5 | Start slowly, one burst | Begin gently and keep the trigger down in one continued burst. Try to finish within 3 seconds. With practice you learn how long the trigger needs to be held. |
| 6 | Signal and inspect | In team riveting, the bucker taps the bar: one tap, not fully seated, hit again; two, good rivet; three, bad rivet, remove it (p. 4-40). Then check there is no rotation or looseness, and that a 0.005 in feeler gauge does not pass under more than half the head circumference. |
| 7 | Put the gun away | Disconnect the air hose whenever the gun is not in use for any appreciable time (p. 4-38). |
Typical mistakes
| Mistake | What happens | Fix |
|---|---|---|
| Starting too fast | The set slips off the rivet and marks it (a smiley) or dents the skin (an eyebrow) | Start slowly, then continue in one burst |
| Driving longer than 3 seconds | The rivet work-hardens before the head is fully formed | Use a more powerful gun, or fewer, harder hits |
| Gun too powerful | Hard to control, can damage the work | Turn the needle valve down; if that fails, a smaller gun |
| Set too small or too large | A small set marks the rivet, a large one marks the material | Match the set to the rivet head |
| Testing the power on metal | Damages the set face | Test only on wood |
| Triggering with no work under the set | Set can fly out; injury | Never trigger unless the set is against wood or a rivet; never point the gun at anyone |
H-31 pp. 4-38. The gun is for driving rivets and nothing else.
Care and storage
Keep the sets clean. The Handbook says rivet headers should be kept clean, with a smoothly polished working face. A pitted face prints on every rivet head it touches.
Check the set and spring before every session. The spring retains the set; if it is missing the set can leave the barrel.
Air off when idle. Disconnect the hose between jobs. Follow the gun maker's instructions for oiling and for the air line; the Handbook does not give a lubrication schedule.
Vibration. The Handbook notes reduced-vibration guns and bars have been developed to lower the risk of carpal tunnel syndrome (p. 4-38).
Quick check
A rivet takes 6 seconds of driving to form its head. What does the Handbook point to?
- The gun is too light for that rivet
Best fit. A rivet should be upset in 1 to 3 seconds. A gun that is too light work-hardens the rivet before the head forms.
- The bucking bar is too heavy
Not this one. A heavy bar bulges the material away from the shop head; it does not explain slow driving.
- The air pressure is too high
Not this one. Normal air is 90 to 100 psi. Too much force is hard to control, not slow.
Next step: try the next gun size up, or check the set and the bar.
Questions people actually ask
What air pressure does a rivet gun need?
The Airframe Handbook gives 90 to 100 psi for pneumatic rivet guns (p. 4-37). The gun's own data plate or manual governs.
How long should it take to drive a rivet?
One to three seconds. If it takes longer, the rivet work-hardens before the head forms, which is a sign the gun is too light (p. 4-38).
Which gun for a 1/8 in rivet?
The Handbook names the 3X for smaller rivets in thinner structure and the 4X for normal work (dash 8, or 1/4 in). Choose by the largest rivet you will drive all day; see the buying guide for rated capacities.
Limits of this guide
What the sources support, and no further.
- Not approved data. The SRM or drawing names the rivet, the set and any special driving method. This page describes typical practice from the FAA handbooks.
- Gun sizes by maker. The 2X to 7X names come from an old manufacturer series; ratings differ by brand. Use the maker's rated capacity.
- No lubrication or air-line figures. The sources give none, so none are shown.
Where to buy
Distributors coming soon.
Sources
- FAA-H-8083-31B, AMT Handbook: Airframe (2023), Chapter 4 — pp. 4-37 to 4-38, "Pneumatic Rivet Gun", "Rivet Sets/Headers", Fig. 4-87; p. 4-40, tap code and rivet inspection.